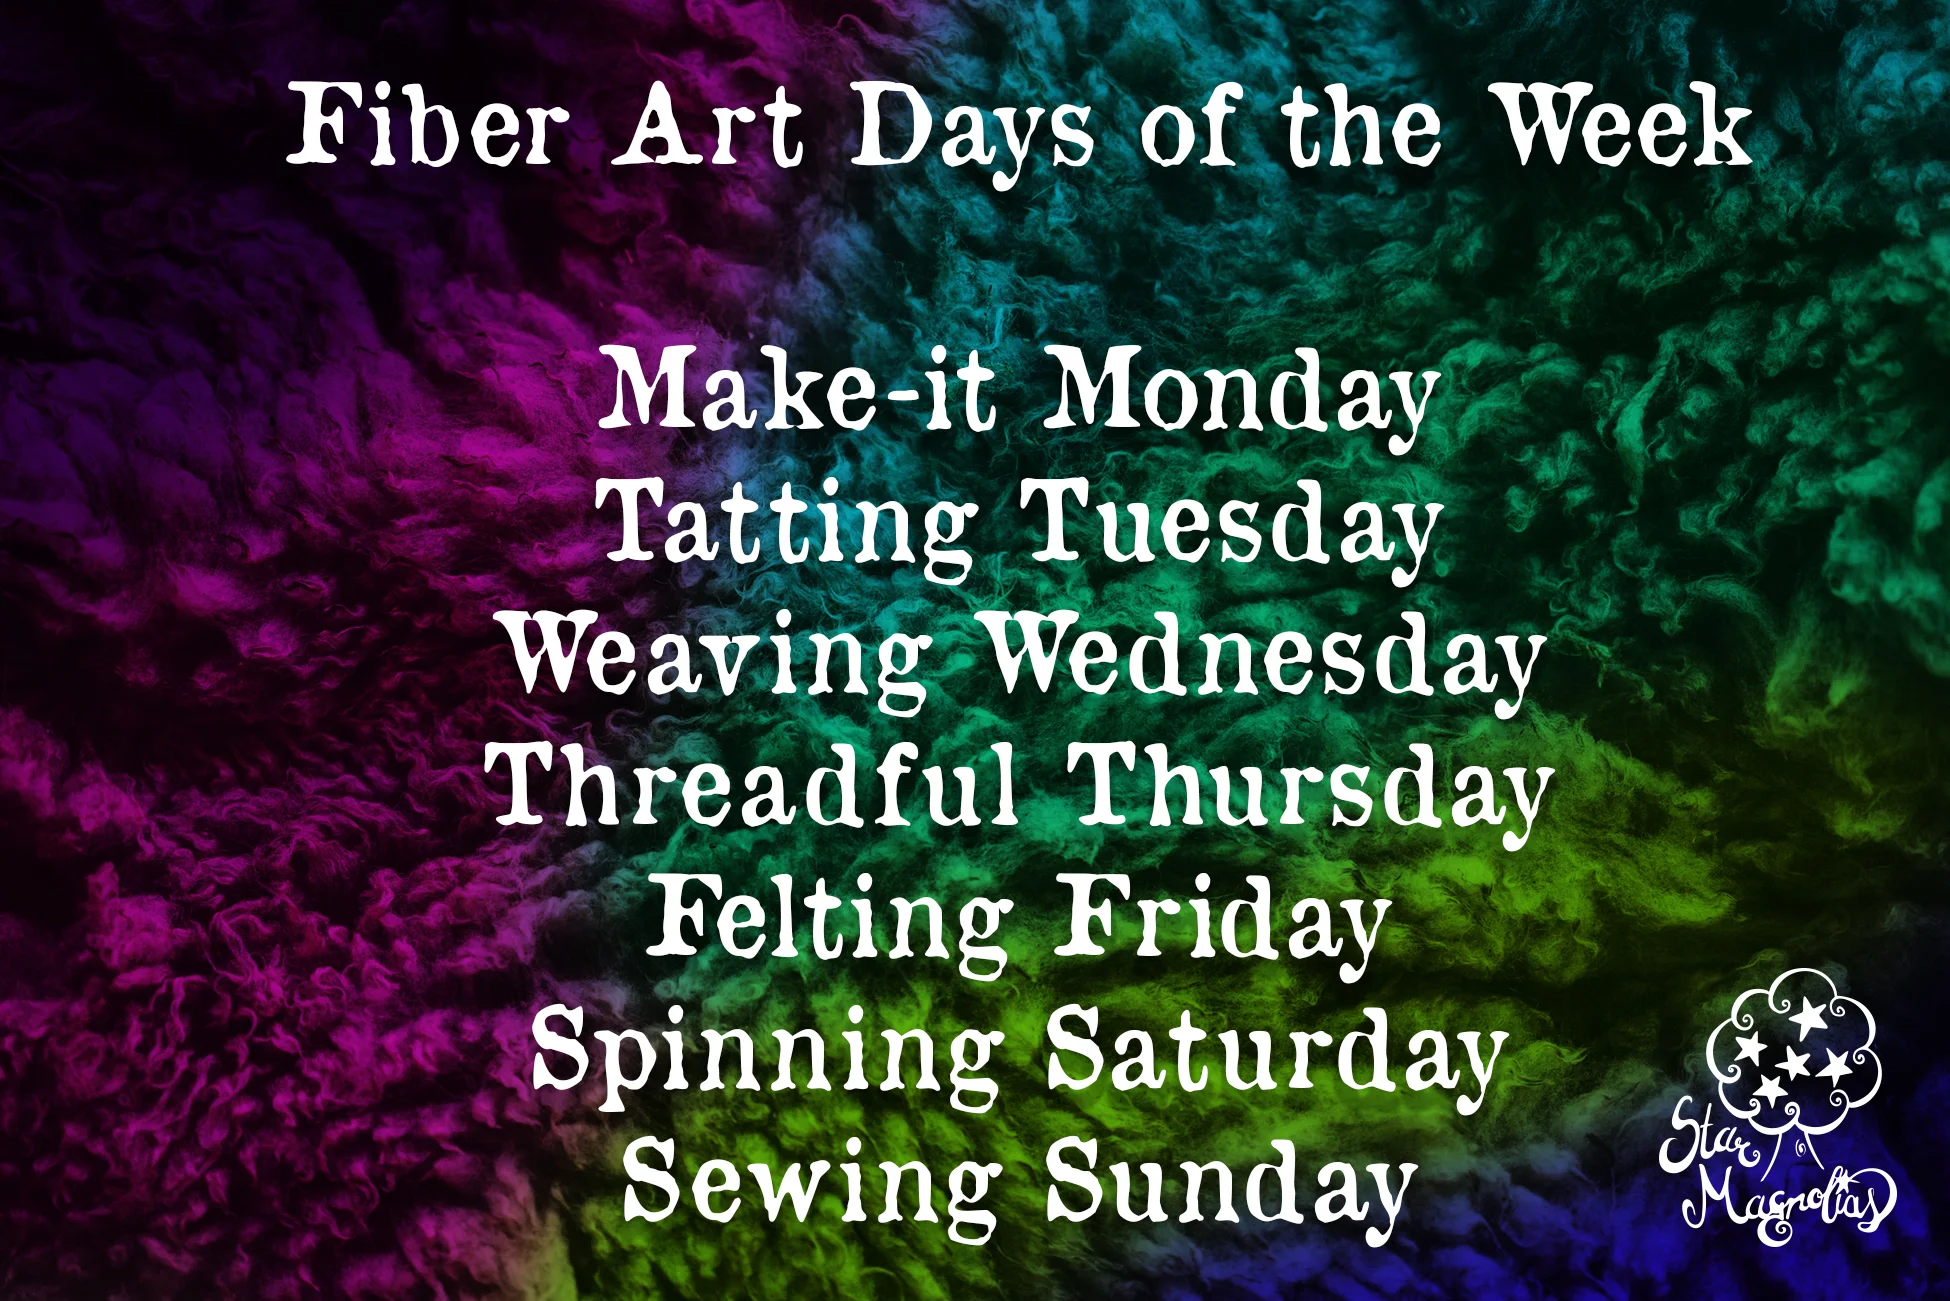
Fiber Art Days of the Week - Week 1
FTC Disclosure: Please note that some of the links in this post are affiliate or referral links (full disclosure here), and if you make a purchase or sign up for a service within a certain timeframe after clicking on one of those links, I may earn a small commission paid by the retailer at no extra cost to you. I wouldn't recommend anything that I don’t or wouldn't use myself. Thank you for your support!
This post was last edited/updated in March 2021.
If you’re reading this post, I want to preface this by saying that no, I didn’t manage to stick to this, but at nearly two months, I stuck to it for far longer than any other routine-type challenge for myself, which says a lot. I’d since learned that this (difficulty sticking to routines) is an ADHD thing. 😬 (which yes, I am diagnosed with having)
I keep trying (and failing) and trying (and failing) - but something about this particular worked. There were definite problems. One was that my intention was to work on each thing for a minimum of an hour a day. The minimum part wasn’t a problem, because each day I’d end up spending several hours on each thing (and I think I sort of realized this towards the end, just didn’t know why). So in reality, this was fine, it’s that the rest of my life lacked structure and this ended up taking over. So many people loved this idea though, and wanted to come up with something similar, that I decided to leave my fiber art “days of the week” posts up in the “great unpublishing and website overhaul of 2021” (don’t worry, most of what I unpublished wasn’t fiber art related).
Will I try something like this again in the future? If I do, it won’t be for a long time, and definitely not to this extent. While it did challenge me to spend more time on my other fiber arts, when it comes to slowly building a workable, maintainable routine in my life (my entire day-to-day life, not just fiber art), I plan to start slow and limited. I need to do what is essentially a Total Elimination Diet on my life, reducing everything down to bare essentials that are my top personal priorities, and once my brain adjusts to that (30 days? 60 days?) I may introduce one more thing. Then try again for another 30 days. It’ll take a long time, but this yo-yo routining I’ve been doing hasn’t been working for me.
If you don’t struggle with routines, love to challenge yourself, want to work your hobbies into your life into a 7-day-week structure, feel free to try it. And if you’re more like me, feel free to try anyway, journal it, and see if there’s something about this one that stuck out for you.
In my 2018 year-end review I wrote about a few personal goals, one being embracing wabi sabi, and another was trying out something new, by assigning various crafts to different days of the week. That’s not to say that I wouldn’t also be able to do other things on those days, as I know that would just end up causing me to procrastinate in other ways, but it would encourage me to at least try to spend an hour on these specific crafts on those days in addition to whatever else I had planned. This also helps on those days where I feel like I’m so busy I can’t focus on anything at all, but spend most of my time thinking about how I don’t have time to do anything rather than just doing the things. (It’s a bit difficult to explain.) So this helps with the thought that “you only need to focus on this for one hour, out of the many hours of the day.” The goal here for me isn’t to be a jack of all trades - needle felting is still my number one, but I feel that learning and exploring other areas of fiber and textile art will really help to inspire me in my needle felting art, and maybe even make it more of a mixed-fiber-media thing. In case you want to try any of these for yourself, I went ahead and included some of my favorite resources, and will continue to do so in the subsequent weeks as I find new ones.
I also mentioned I would be documenting and sharing my learning process with you, because it helps to hold me accountable. Or at least give it an honest effort, lol. Hopefully I’m not being overly ambitious here. (2021 me: I was, but I wouldn’t be me if I wasn’t.)
This (the image above) is what I came up with for myself. If this seems like something you’d like, feel free to adapt it to whatever crafts or mediums you enjoy using. Here is a breakdown:
Make-it Monday - This one is a wild-card. This way I am making something, but what it is can be anything. It can be knitting, crocheting, art journaling, whatever. Things that don’t necessarily fit in the other days of the week, though it’s not exclusive of them either. Monday is the only day not specifically fiber art.
Tatting Tuesday - I received some tatting shuttles in my stocking after having come across tatting a few months prior, and thought it looked like a lot of fun, easy to transport, and relatively inexpensive to try. I already have several spools of crochet thread which I use for many other things (it’s relatively cheap and quite handy), and as long as you’ve got that and a tatting shuttle or two, you’re ready to go. If you are interested in learning how, this is my favorite channel on tatting and really easy to follow.
Weaving Wednesday - 7 years ago (might have been 8, can’t remember now) I was gifted a rigid heddle loom, which I really really really wanted to learn. I even had a few failed starts. Then I became pregnant, and we were moving, so both with having to pack things up and my belly getting in the way, it was put away. I’d done some weaving since then, but on a simple frame loom that I made from taking a canvas frame and putting some finishing nails in it. And my daughter has the Melissa & Doug frame loom. So I got myself the book Inventive Weaving on a Little Loom, and I’m determined to give it another shot. If you’re interested in tapestry weaving, please check out this adorable little blog by the amazing artist Sarah C Swett.
Threadful Thursday - a silly attempt at trying to come up with another fiber art word for Thursday. This is for learning/brushing up on needlework, like embroidery, cross-stitch, blackwork, etc. If you’re interested in embroidery, this is my absolute favorite blog for that, the best part being the stitch dictionary! There are literally hundreds of various stitches on there, complete with photos and how-to’s. Of course, TAST is a Tuesday thing, but I already had tatting picked for that, so Thursday it is for me. I also have a book or two on embroidery, but with this blog I really don’t feel compelled to reach for it as much. If cross-stitch is your thing, this is a pretty decent resource to help you get started, as well as this ultimate guide. Here is one that includes blackwork guides, and if it’s patterns you’re looking for, here are some including adaptations from old art, and honestly a really neat blog as well. You may find that the links I provided for you share similarities, because they’re all just different takes on embroidery work.
Felting Friday - I think this is pretty self-explanatory, and you’re already in the right place when it comes to needle felting guides!
Spinning Saturday - Those of you who follow me on Facebook know that I received a beautiful spinning wheel under the tree this year (specifically the Merlin Tree Roadbug)! I’m learning to spin on that which will then allow me to create yarns to use in my woven pieces, or include them in my felting projects. I still haven’t found any blogs that have many guides on that (if you have some let me know), but I have found a few youtube channels, like UrbanGypZ (who also has videos on weaving), ExpressionFiberArts (with videos on knitting and crocheting as well), and Crafty Housewife Yarns. This is a great tutorial on spinning corespun yarns. There are tons of videos out there, but not sure if there is a channel that is dedicated only to spinning that isn’t mostly teasers for their classes.
Sewing Sunday - Sewing anything - clothes, items, textile art, quilting, applique, etc. One of my goals this year is to sew more of my own clothing, but I also want to get much better at sewing in general. Plus this would also encourage me to get back to work on my English paper-piecing hexie fabric that I started years ago. Or work on some hand-sewn applique. Or finally get to work on the Ann Wood patterns I purchased a while back.
OK, so now that you know how this whole thing works, let me show you the things I worked on this past week!
what did I make this past week?
Remember, I’m also embracing wabi sabi this year, and there are all sorts of mistakes going on here. Giving myself permission to let go of perfectionism seems like such a minor thing, but it’s a huge mental switch that has allowed me to feel free to play. Oddly enough, even with the mistakes I’d made this week, I actually love everything I’ve made, and it’s starting to fall more in line with the somewhat haphazard, even whimsical things that I love that others make.
For the purpose of the blog, I decided to start with Sunday (even though I actually started earlier, like the yarns I spun for Weaving Wednesday) so I can get this post up for you on Sundays.
sewing sunday
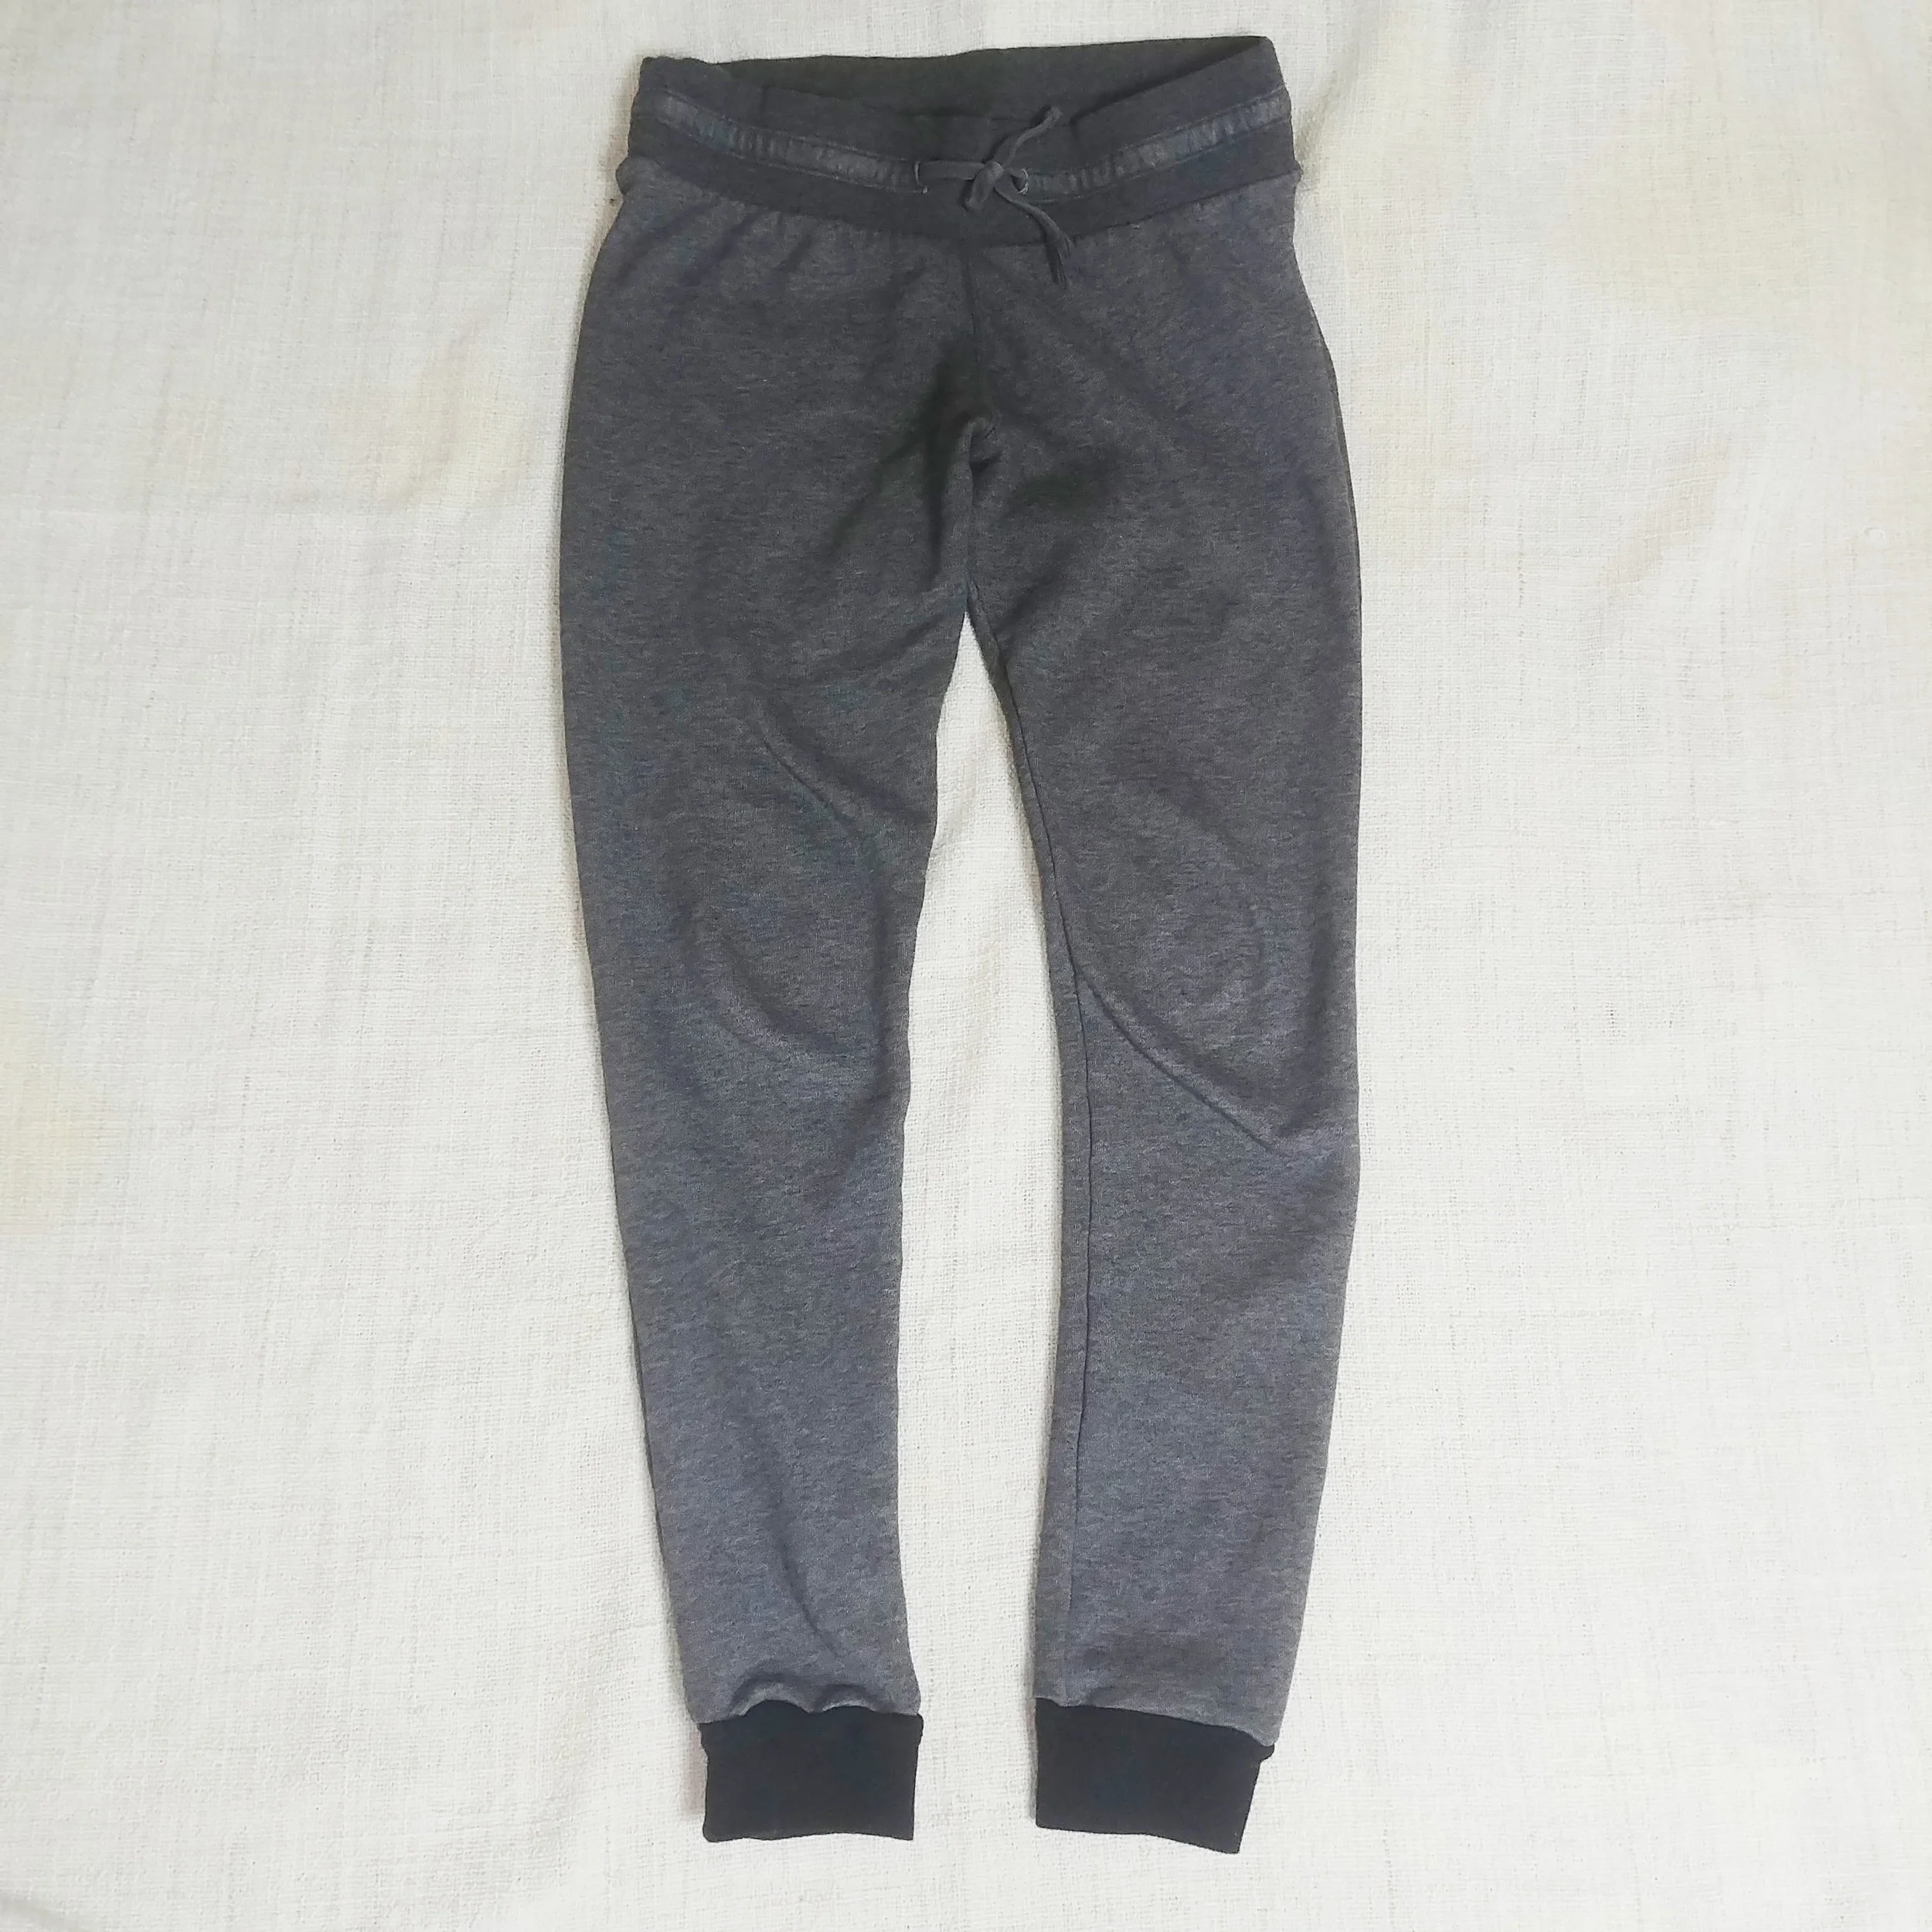
My first attempt at sewing clothes started by taking an old pair of sweats that I’d fallen out of love with, since I’m not a fan of loose bottoms as of late, and turn them into joggers using this guide. It was also my first time using my new serger, which definitely had a bit of a learning curve to it, but also allowed me to complete the project start to finish in just over an hour. To make them, I cut around a pair of current joggers that fit me, plus leaving about 1/2 an inch for seam allowance.
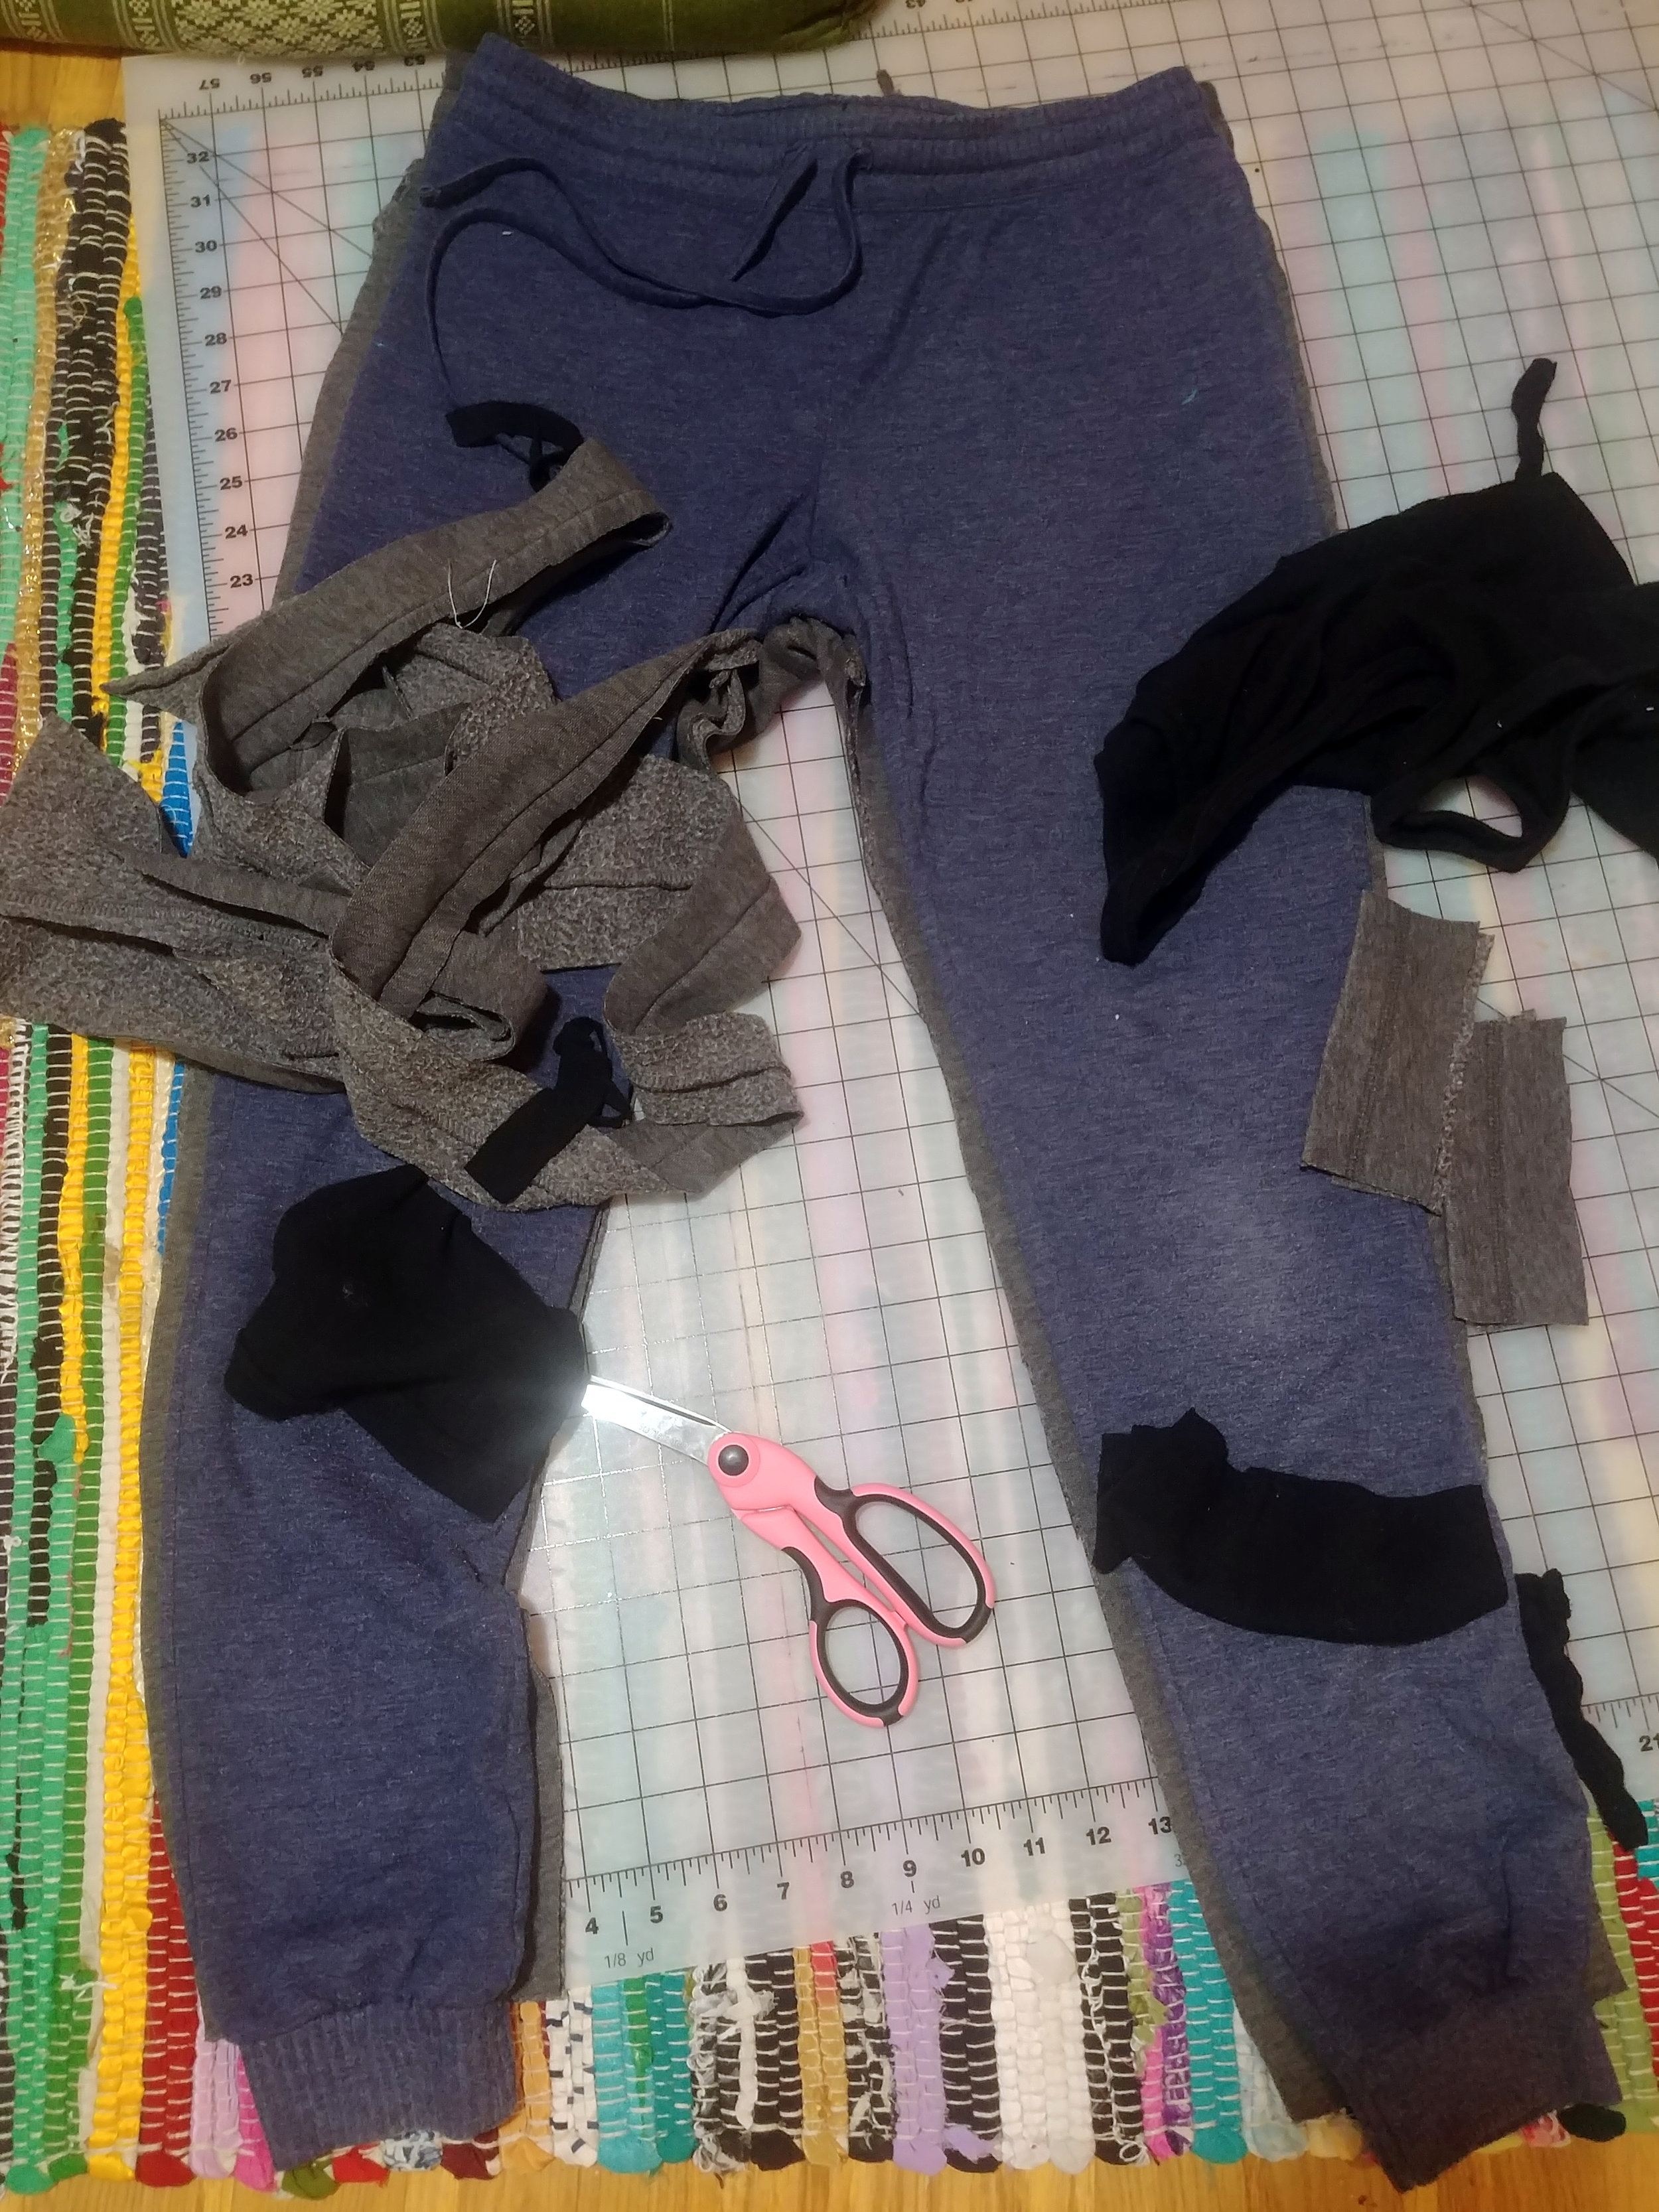
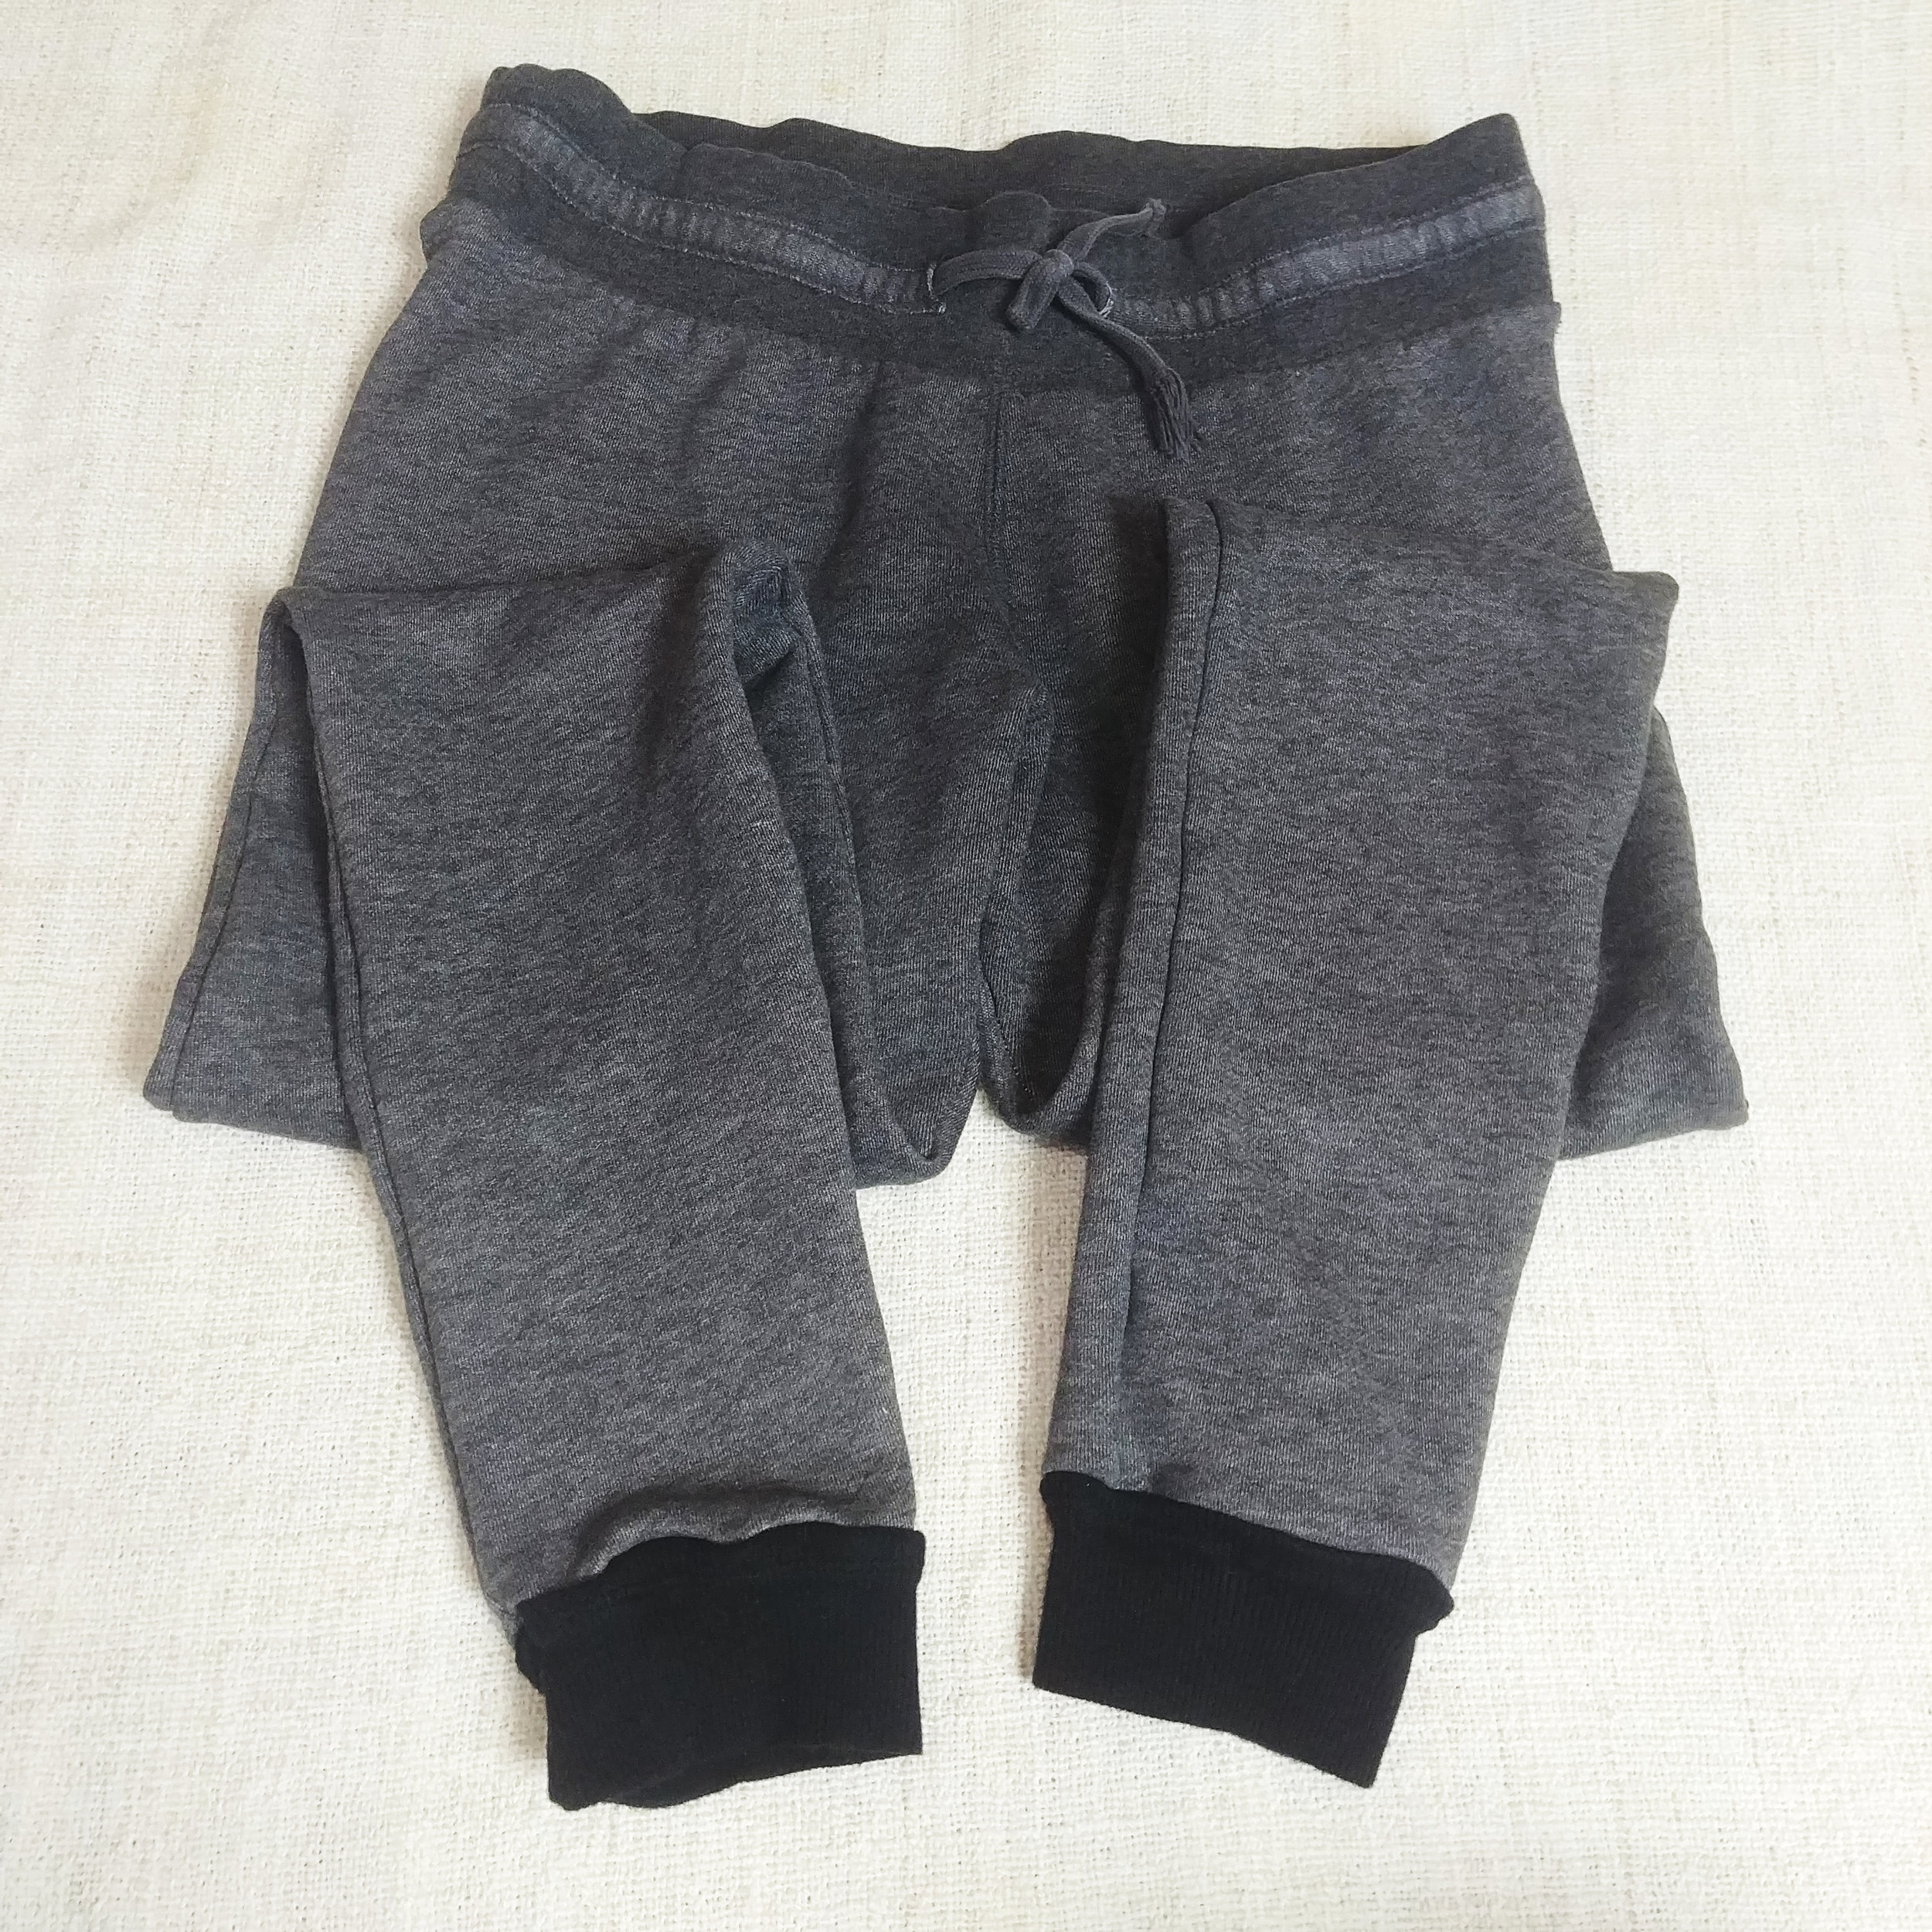
Making those first cuts made me a bit anxious, which is why I think it helped trying it on a pair that I’d stopped wearing a while ago (and if I screwed up too much, I could’ve just made other things from it). For the cuffs, I cut up a ribbed tank from the donate pile. We have a pile of “donate” clothes (mostly to a fiber recycling program, not to wear) that is now perfect for me to mess around with and see what I can salvage. End result: I realized afterwards that the joggers I traced had a thinner, stretchier material than these sweatpants (which are really quite thick), so they’re a bit tight and more like thick leggings than joggers, but they are still quite comfortable! I had to hand stitch the parts near the waistband, because it was too thick to get under the presser foot and left a gap. Also, I think I could’ve made the bottom cuffs tighter. They aren’t stretched out or anything, but they’re not tight either, just more of a decorative touch. The photos of the final end product
Now that I have this success behind me, I’m feeling a bit more confident about future sewing projects.
Make-it Monday

I named this horse Terpsichore, after the muse of dance.
I’ve been wanting to try some of the things I’ve pinned on Pinterest, as well as some of the other projects I have saved on my computer to try. One artist whose work I am totally in love with is Ann Wood, as in I could literally spend hours poring through her blog, and I decided to leap into 2019 (working late NYE night past midnight) working on a paper horse. Seriously, I can’t think of anything better than doing something I love when the ball drops. Photos, instructions and pattern available here if you want to try your own. She was created with Jacquard alcohol inks on white chipboard (one side had a nice shiny smooth surface).
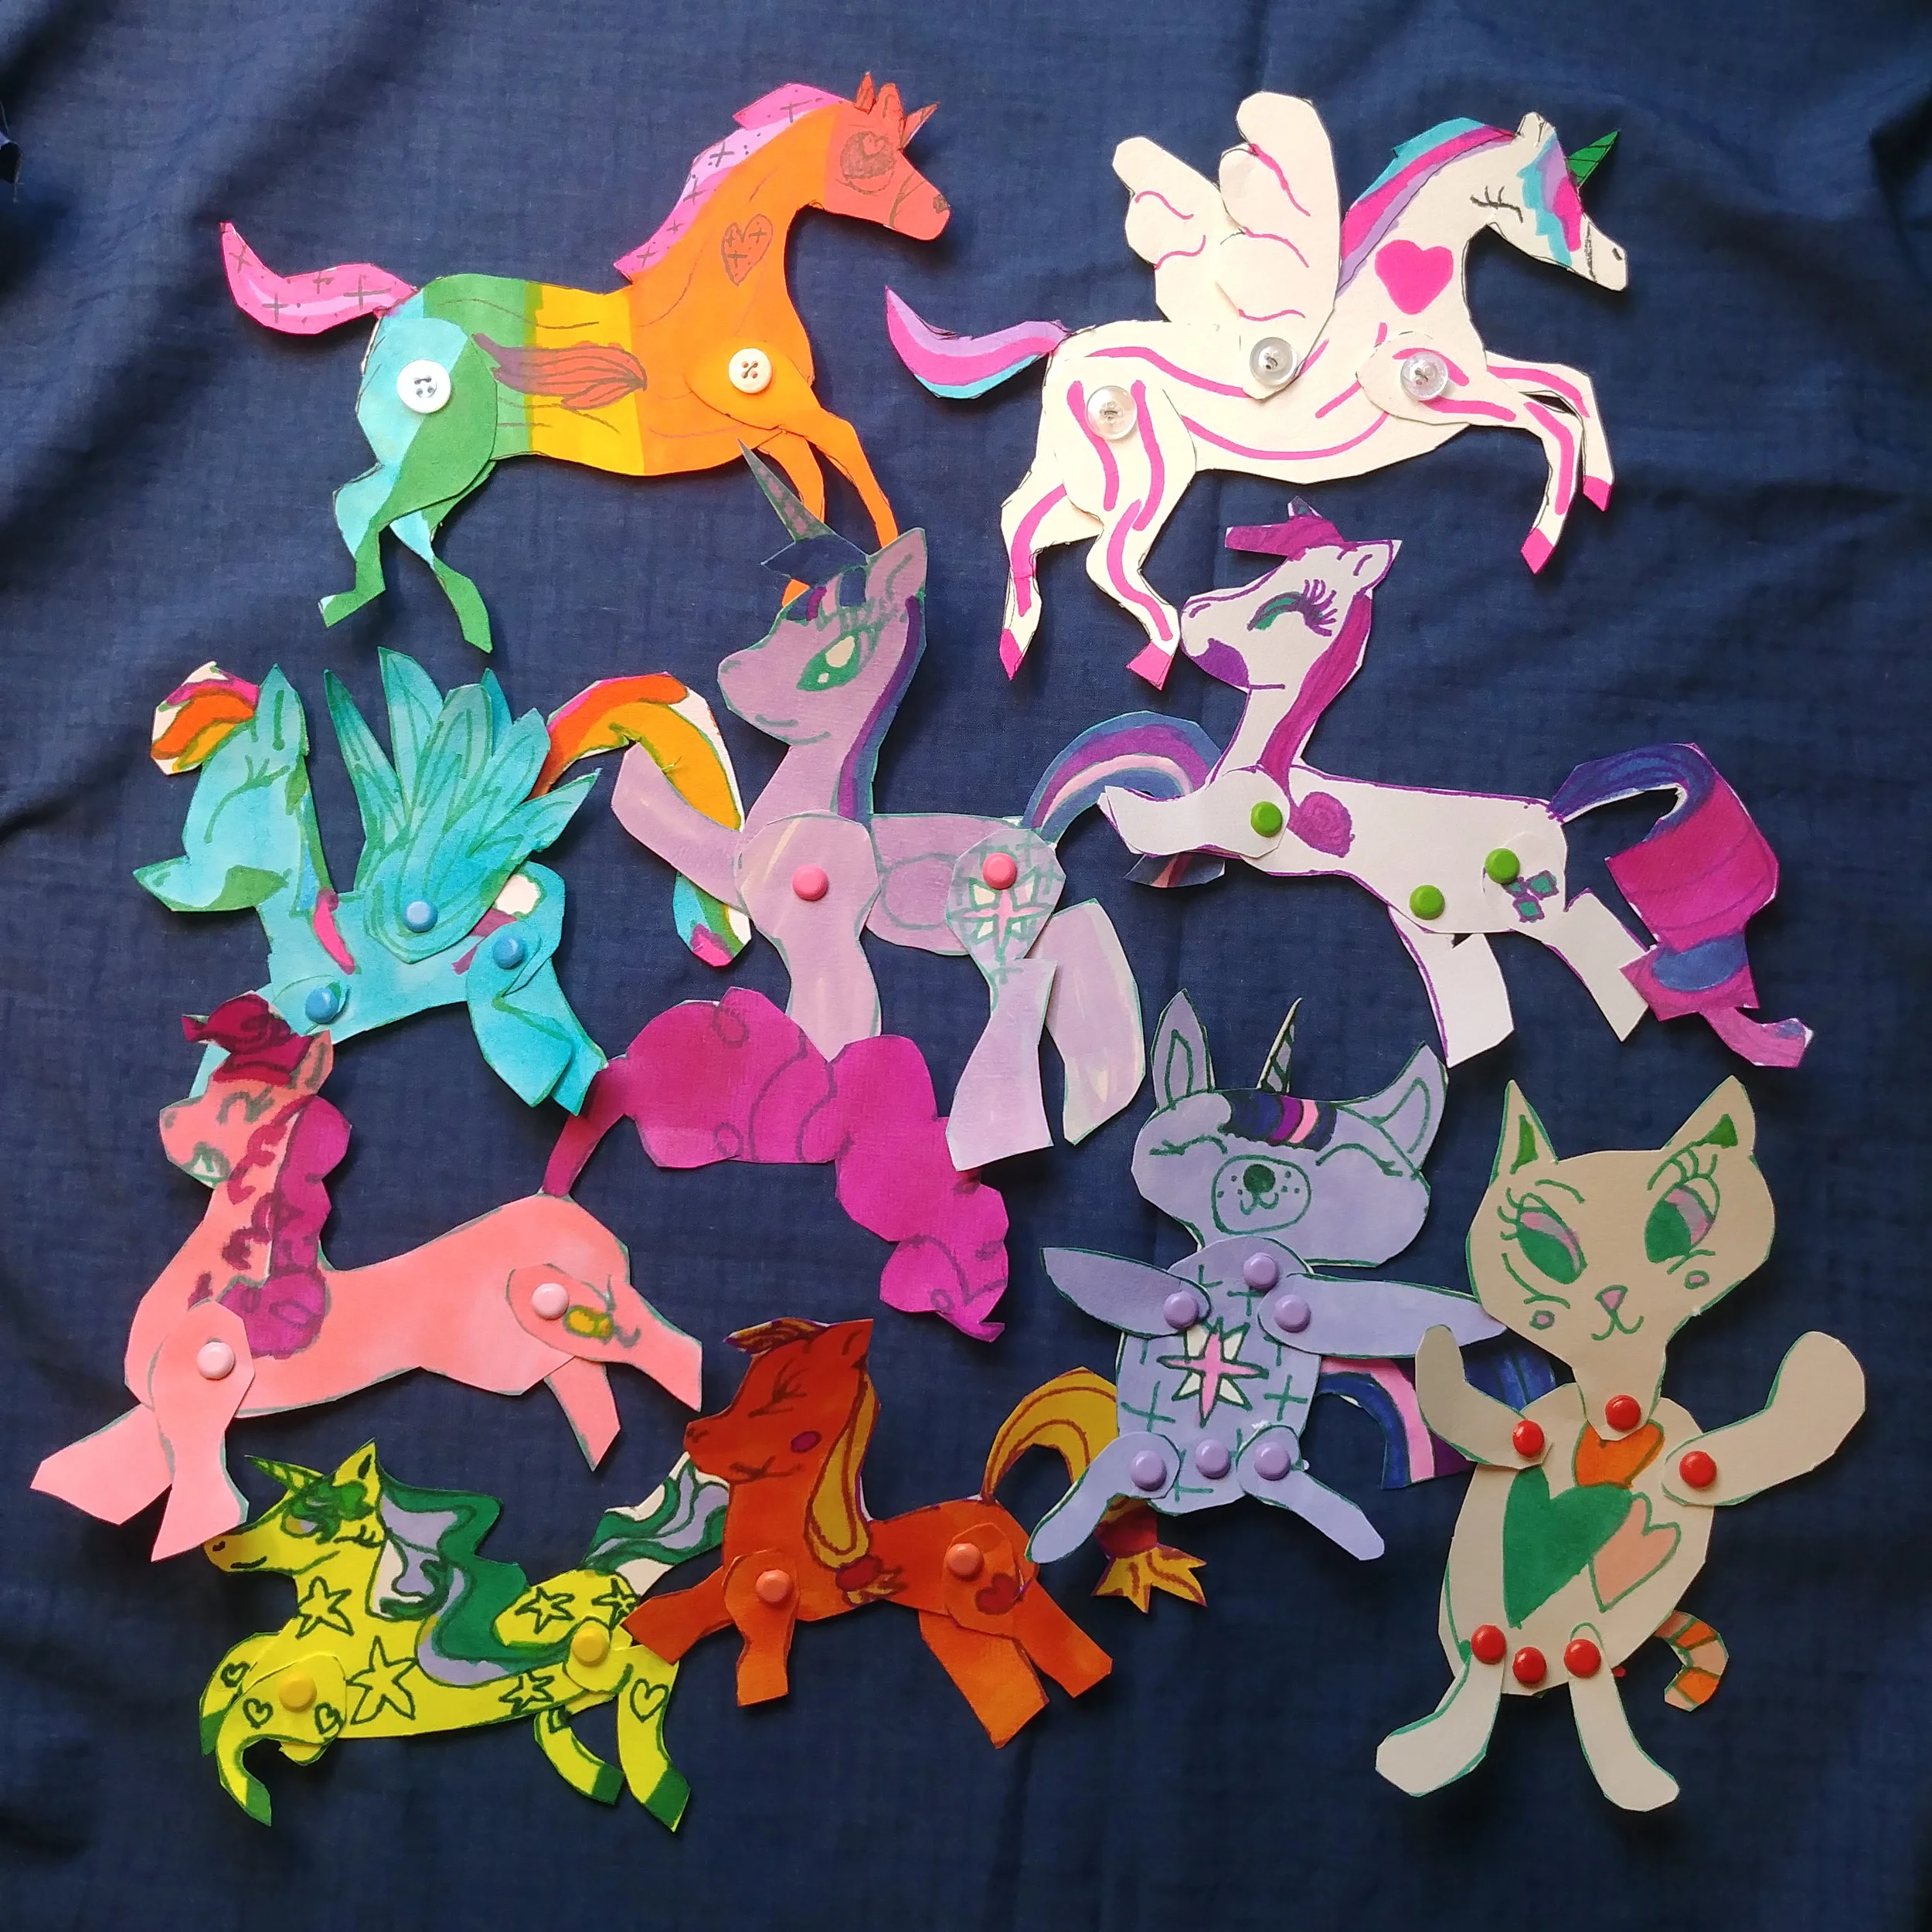
My daughter’s “Stampede” including two based off Ann Wood’s patterns (she added wings to the second), a few of her own horses, a few My Little Pony, a unicorn dog and a cat.
The next morning when I showed my daughter, she wanted to make a few of her own as well! By a few, I mean I think I’m going to be drowning in paper dolls. Also, I had to get her a bag of brads because I couldn’t keep up with the frequent requests for wiring on the buttons.
Tatting Tuesday
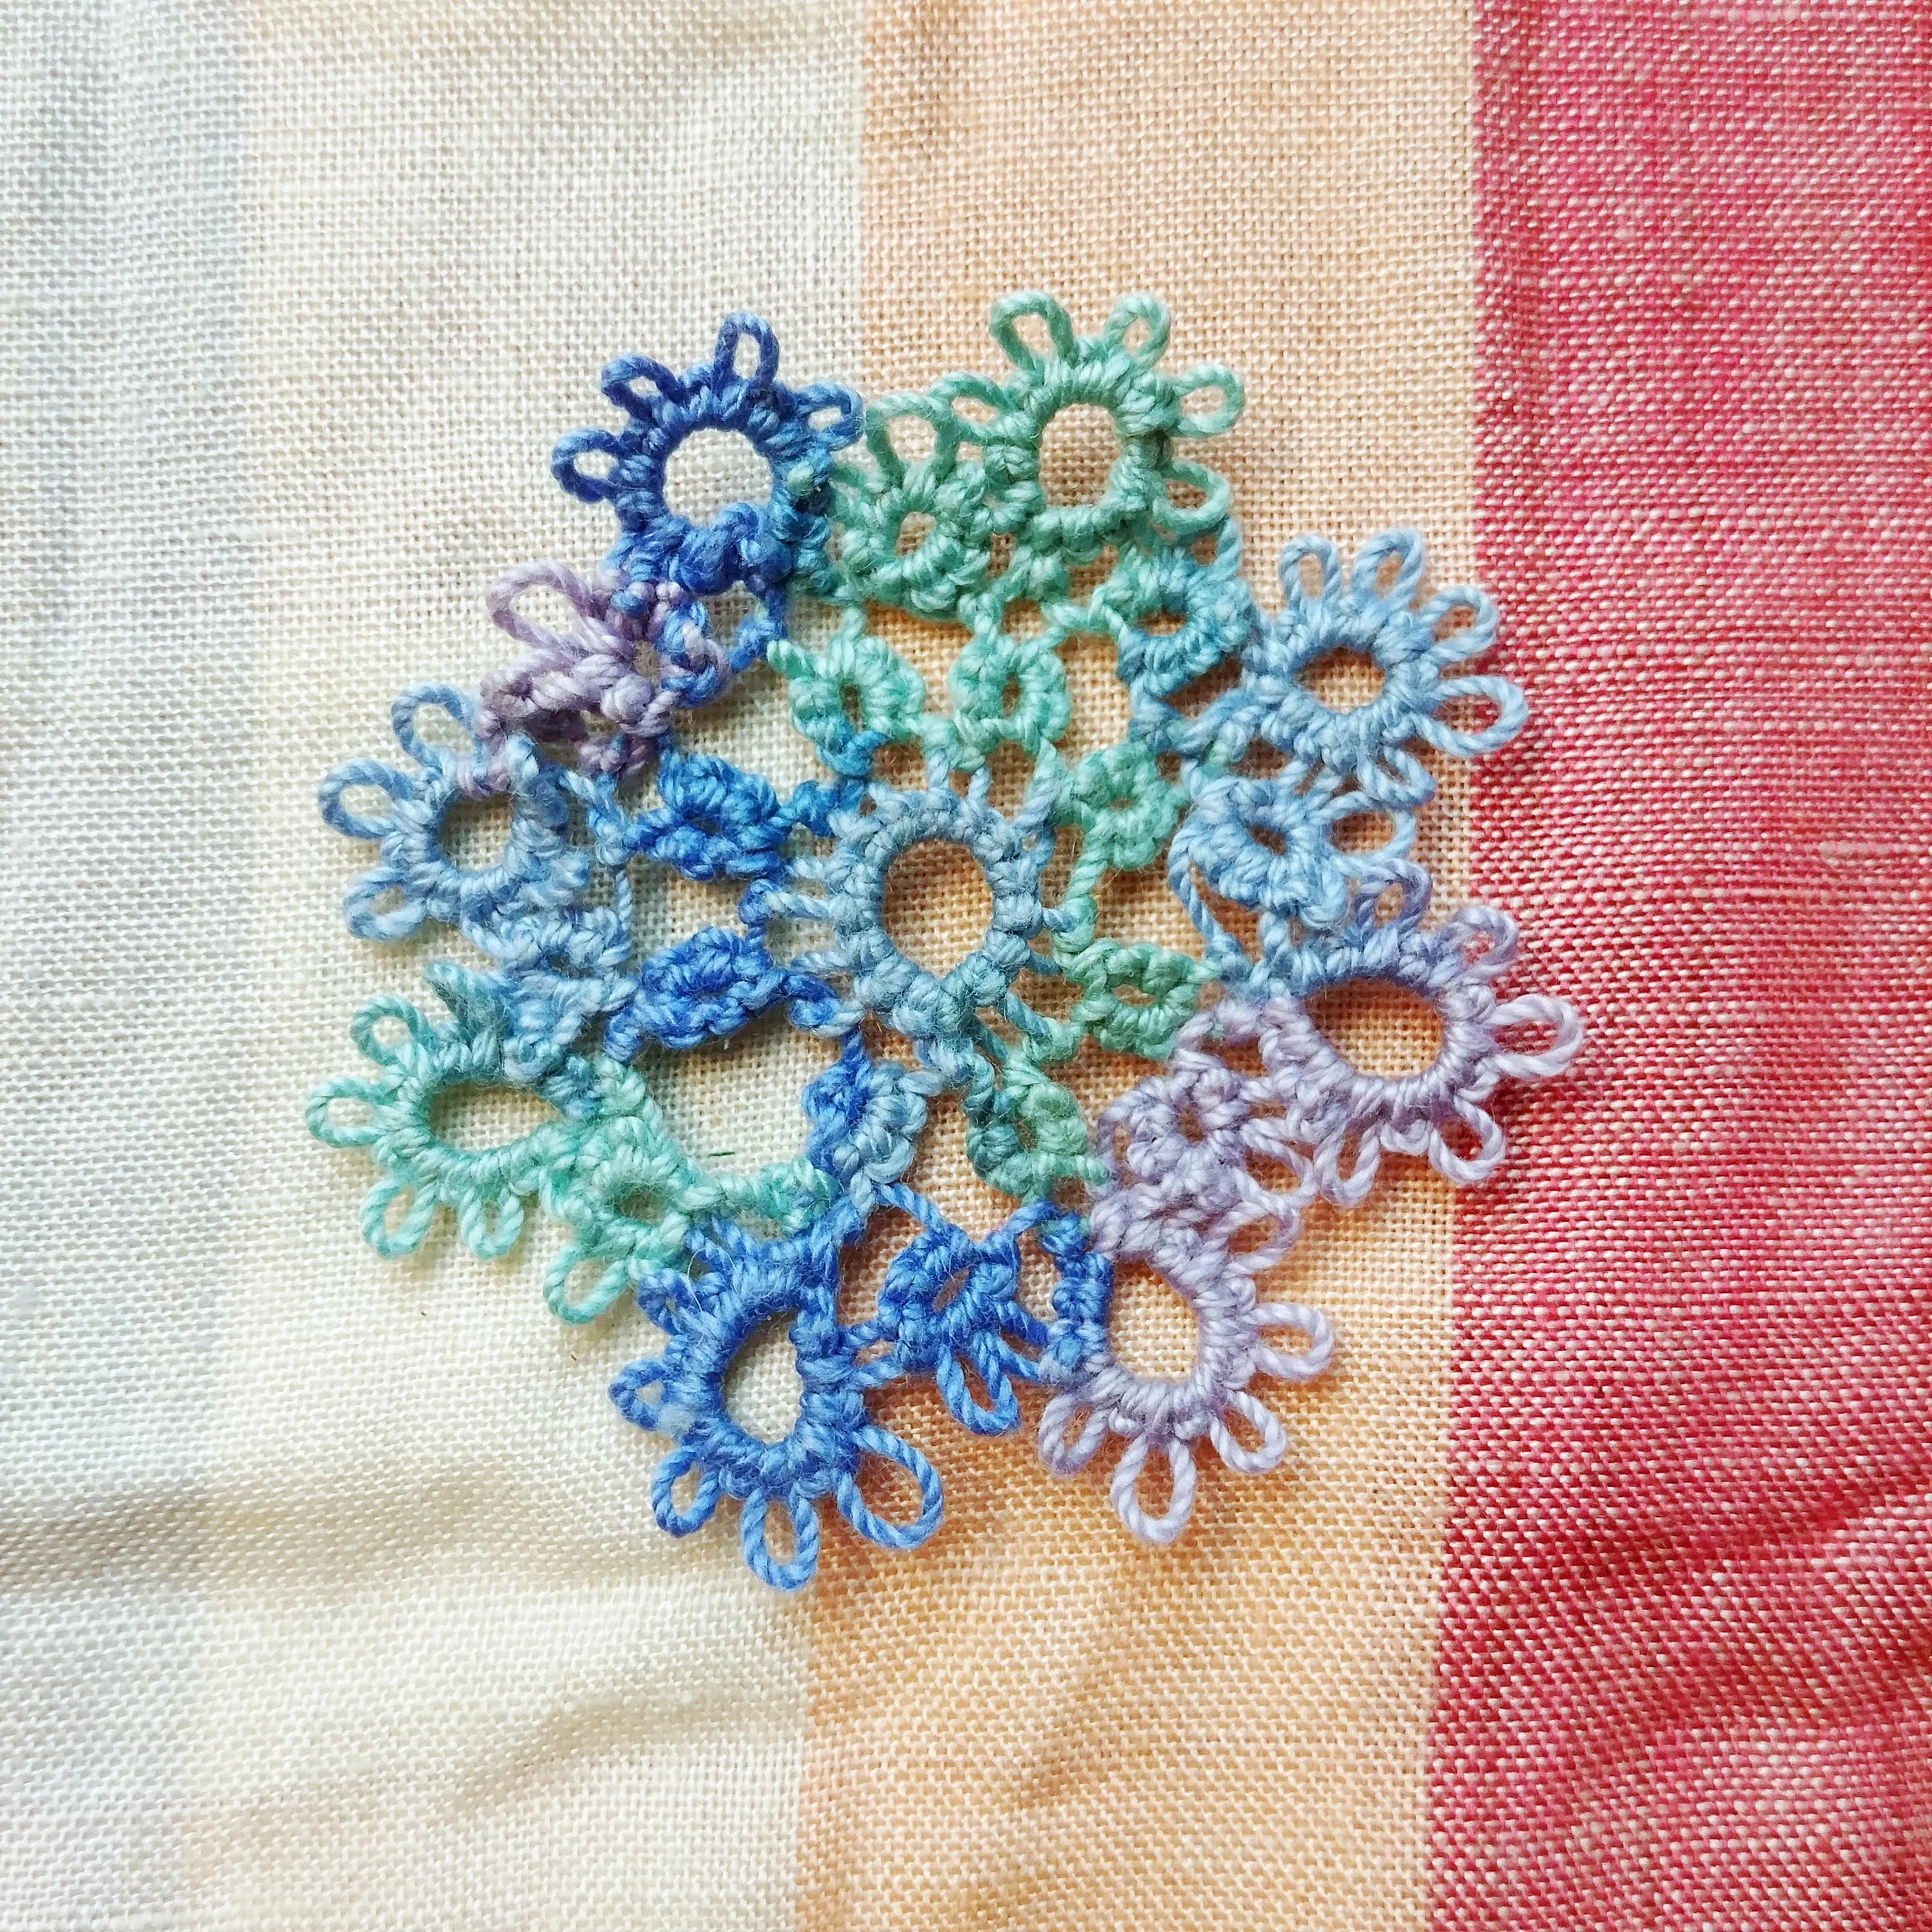
I decided to try my hand at following a YouTube start-to-finish pattern to make tatted medallions. I still have quite a bit of learning to do to know how to read patterns (Facebook link) on paper, but I learn better by following a video anyway. Here’s what I made. I had two false starts (screwed up more than was fixable), and my first medallion still has a few mistakes in it and involved a lot of ripping things out and starting over, but it got done! I also got faster at it as I went.
Also, because these shuttles and projects are so easy to lose track of, I needed to find a “container” that made it easy to transport. Last month, among several gifts that I received from Linda North in an “ornament swap” in Tenney’s fleece & fiber group was this adorable felted coin purse. Well lo and behold, this little purse is the perfect size to carry three shuttles and a little project. Now I can throw it in my bag and should I find myself in a situation where I need to wait, like at the Burger King playground next Tatting Tuesday with my kids while my car gets inspected next door, I’ll have my project handy. Of course, had it been Felting Friday, I’d be bringing my travel tin instead.

This adorable felted coin purse fits my three tatting shuttles and a small project, such as the medallion I made.
weaving wednesday
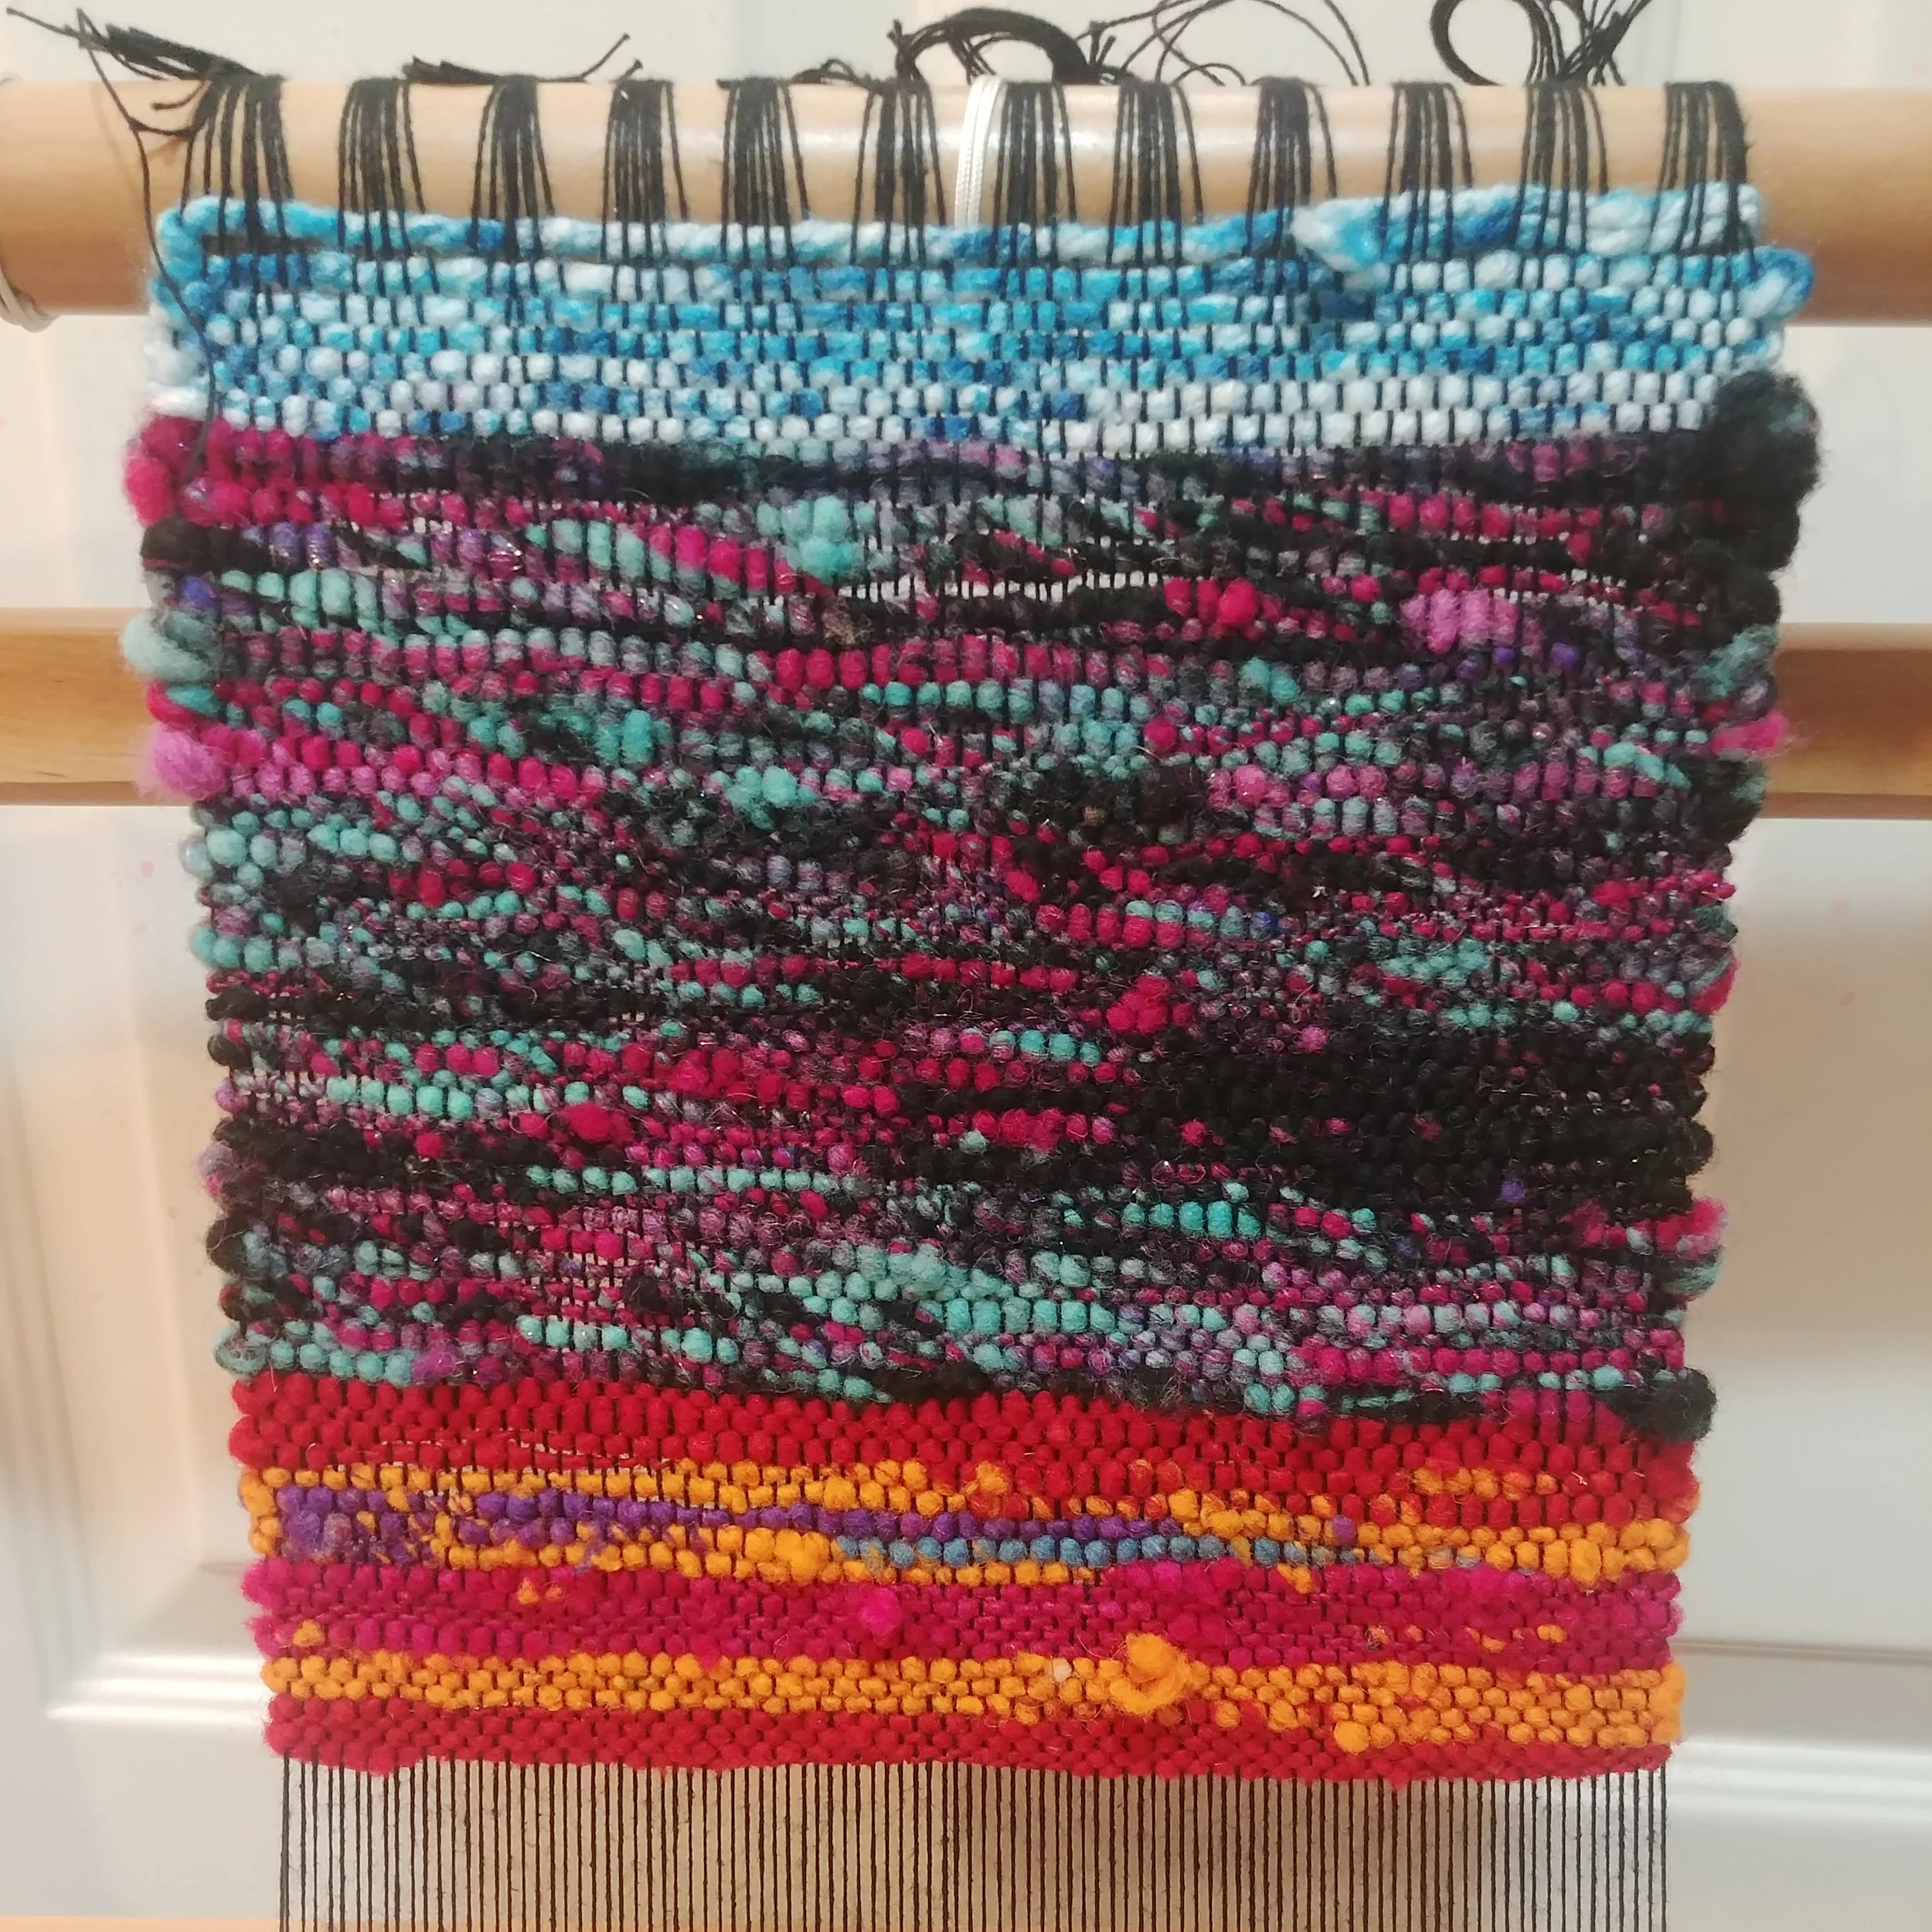
The first two yarns I’d spun are woven on the scarf. The top few rows of blue yarn are scrap acrylic yarn that will get taken out when it’s done before finishing off the ends.
Today consisted mostly of relearning how to warp the loom. It’s been a few years (okay, many... I received my loom long before I started needle felting), and I definitely needed a refresher, lol. I chose the direct warp method. I own a Kromski Harp (24") which also has a built-in warping board on the back of the loom, but direct warp is so much easier I think (I get confused with the whole crossing thing). I remember starting out that I tried both methods. I found this video to be incredibly helpful, and I thought I’d share in case you too have a rigid heddle, and maybe you were struggling with some of the aspects of warping on. With how tiny the warp threads are that I have to use with my particular heddle, this easily took an hour to fill up the width I was wanting. Note to self: get the weaver’s choice heddle. Once I’d set the twist on the first yarns I spun last Saturday and let them dry, it was time to get to work. This project is going to be a scarf-like display of my spinning progress with each yarn that I make as I’m learning. Depending on how quick or slow I am with learning, this could end up being a several-scarf-project.
threadful thursday

January crazy quilt block with blue patterned fabrics, 6.5 inches square, with red chain stitch, red linked stitch, orange starburst chain stitch, chain stitch dot in variegated yellow and beaded linked chain leading to the edges from the dot.
I decided I’m going to join the TAST 2019 challenge on Pintangle and work on the stitches posted. I’m thinking of maybe making crazy quilt as a basis for the stitches I learn this year (so the quilt isn’t the focus, the stitches are), both from the challenge and maybe a few extras! For crazy quilt inspiration, just google CQJP. This one is one of my favorites by far (I am totally in love with the sea-inspired laces, and curious if I can maybe learn how to make some). There’s also a 2020 crazy quilt challenge, the link which has tons of useful resources on making crazy quilts. I could use the “quilt” to make throw pillows or a neat bag, kind-of like one I found at a local artisan shop (photo below). A few other ideas on how to display embroidery would be to make a stitch diary (bound fabric journal) or a large sampler.
I believe the first 20 stitches are foundational ones - basically stitches anyone who is interested in embroidery should know how to do. This week we started off with the chain stitch, which I believe is also the first stitch I personally learned how to do as a child (besides the running stitch). Since I already knew this one, I decided to do a bit of the “beyond TAST” optional challenge and add some of the linked chain stitch as well. I added a regular chain stitch starburst type thing at the end of the linked chain, then did a chain stitch dot, with a beaded linked chain in a variegated floss across the other part of the blue strip.
You’ll be seeing this square throughout January as I continue to embellish it with the following weeks’ stitches, and then I’ll create a new square for February. My square is about 6.5 inches, allowing some seam allowance so I can stitch the squares together at the end.
Speaking of embroider floss, have you seen these? Maybe if I ever pared down on how many colors I own and were the type to carry some in my pocket and randomly pull them out just to do some stitching in public, I’d totally get some, because they are adorable.

I think this patchwork embroidered bag might be from India? Found this at Material Culture in Philadelphia.
felting friday
I can’t share a photo for Felting Friday for two reasons.
One: it was the monthly exchange item I needed to finish up and get out in the mail, and to avoid the risk of the recipient seeing it before she sees it (it’s a surprise), I’ll have to wait to share it at a later date. And that’s if I even had a photo because…
Two: in my rush to get it in the mail so I could sign up for next month’s - which ended up not happening anyway because I missed the sign up window - I forgot to take a final photo. I do have a few really horrible quality progress photos that I shared with a few friends though.
Since recipients share photos of what they received in the group anyway, I’ll just wait to share when she gets it. I’m actually a bit sad I missed next month sign-up (by 15 minutes) because the theme is outer space. The theme for this one was prehistoric (btw I think mine turned out super cute). That being said, I am trying to decide which of two major projects I’m going to start on as soon as I’m done with my son’s “Letter Buddies.” As soon as I decide and get started, I’ll post it up on the blog. Update: I confirmed with one of the admins that if anyone backs out or wants to jump in, I’ll get to do the swap after all. Maybe I will make next month’s theme anyway. Just in case. Anyone want to join the Monthly Needle Felting Exchange group?
spinning saturday
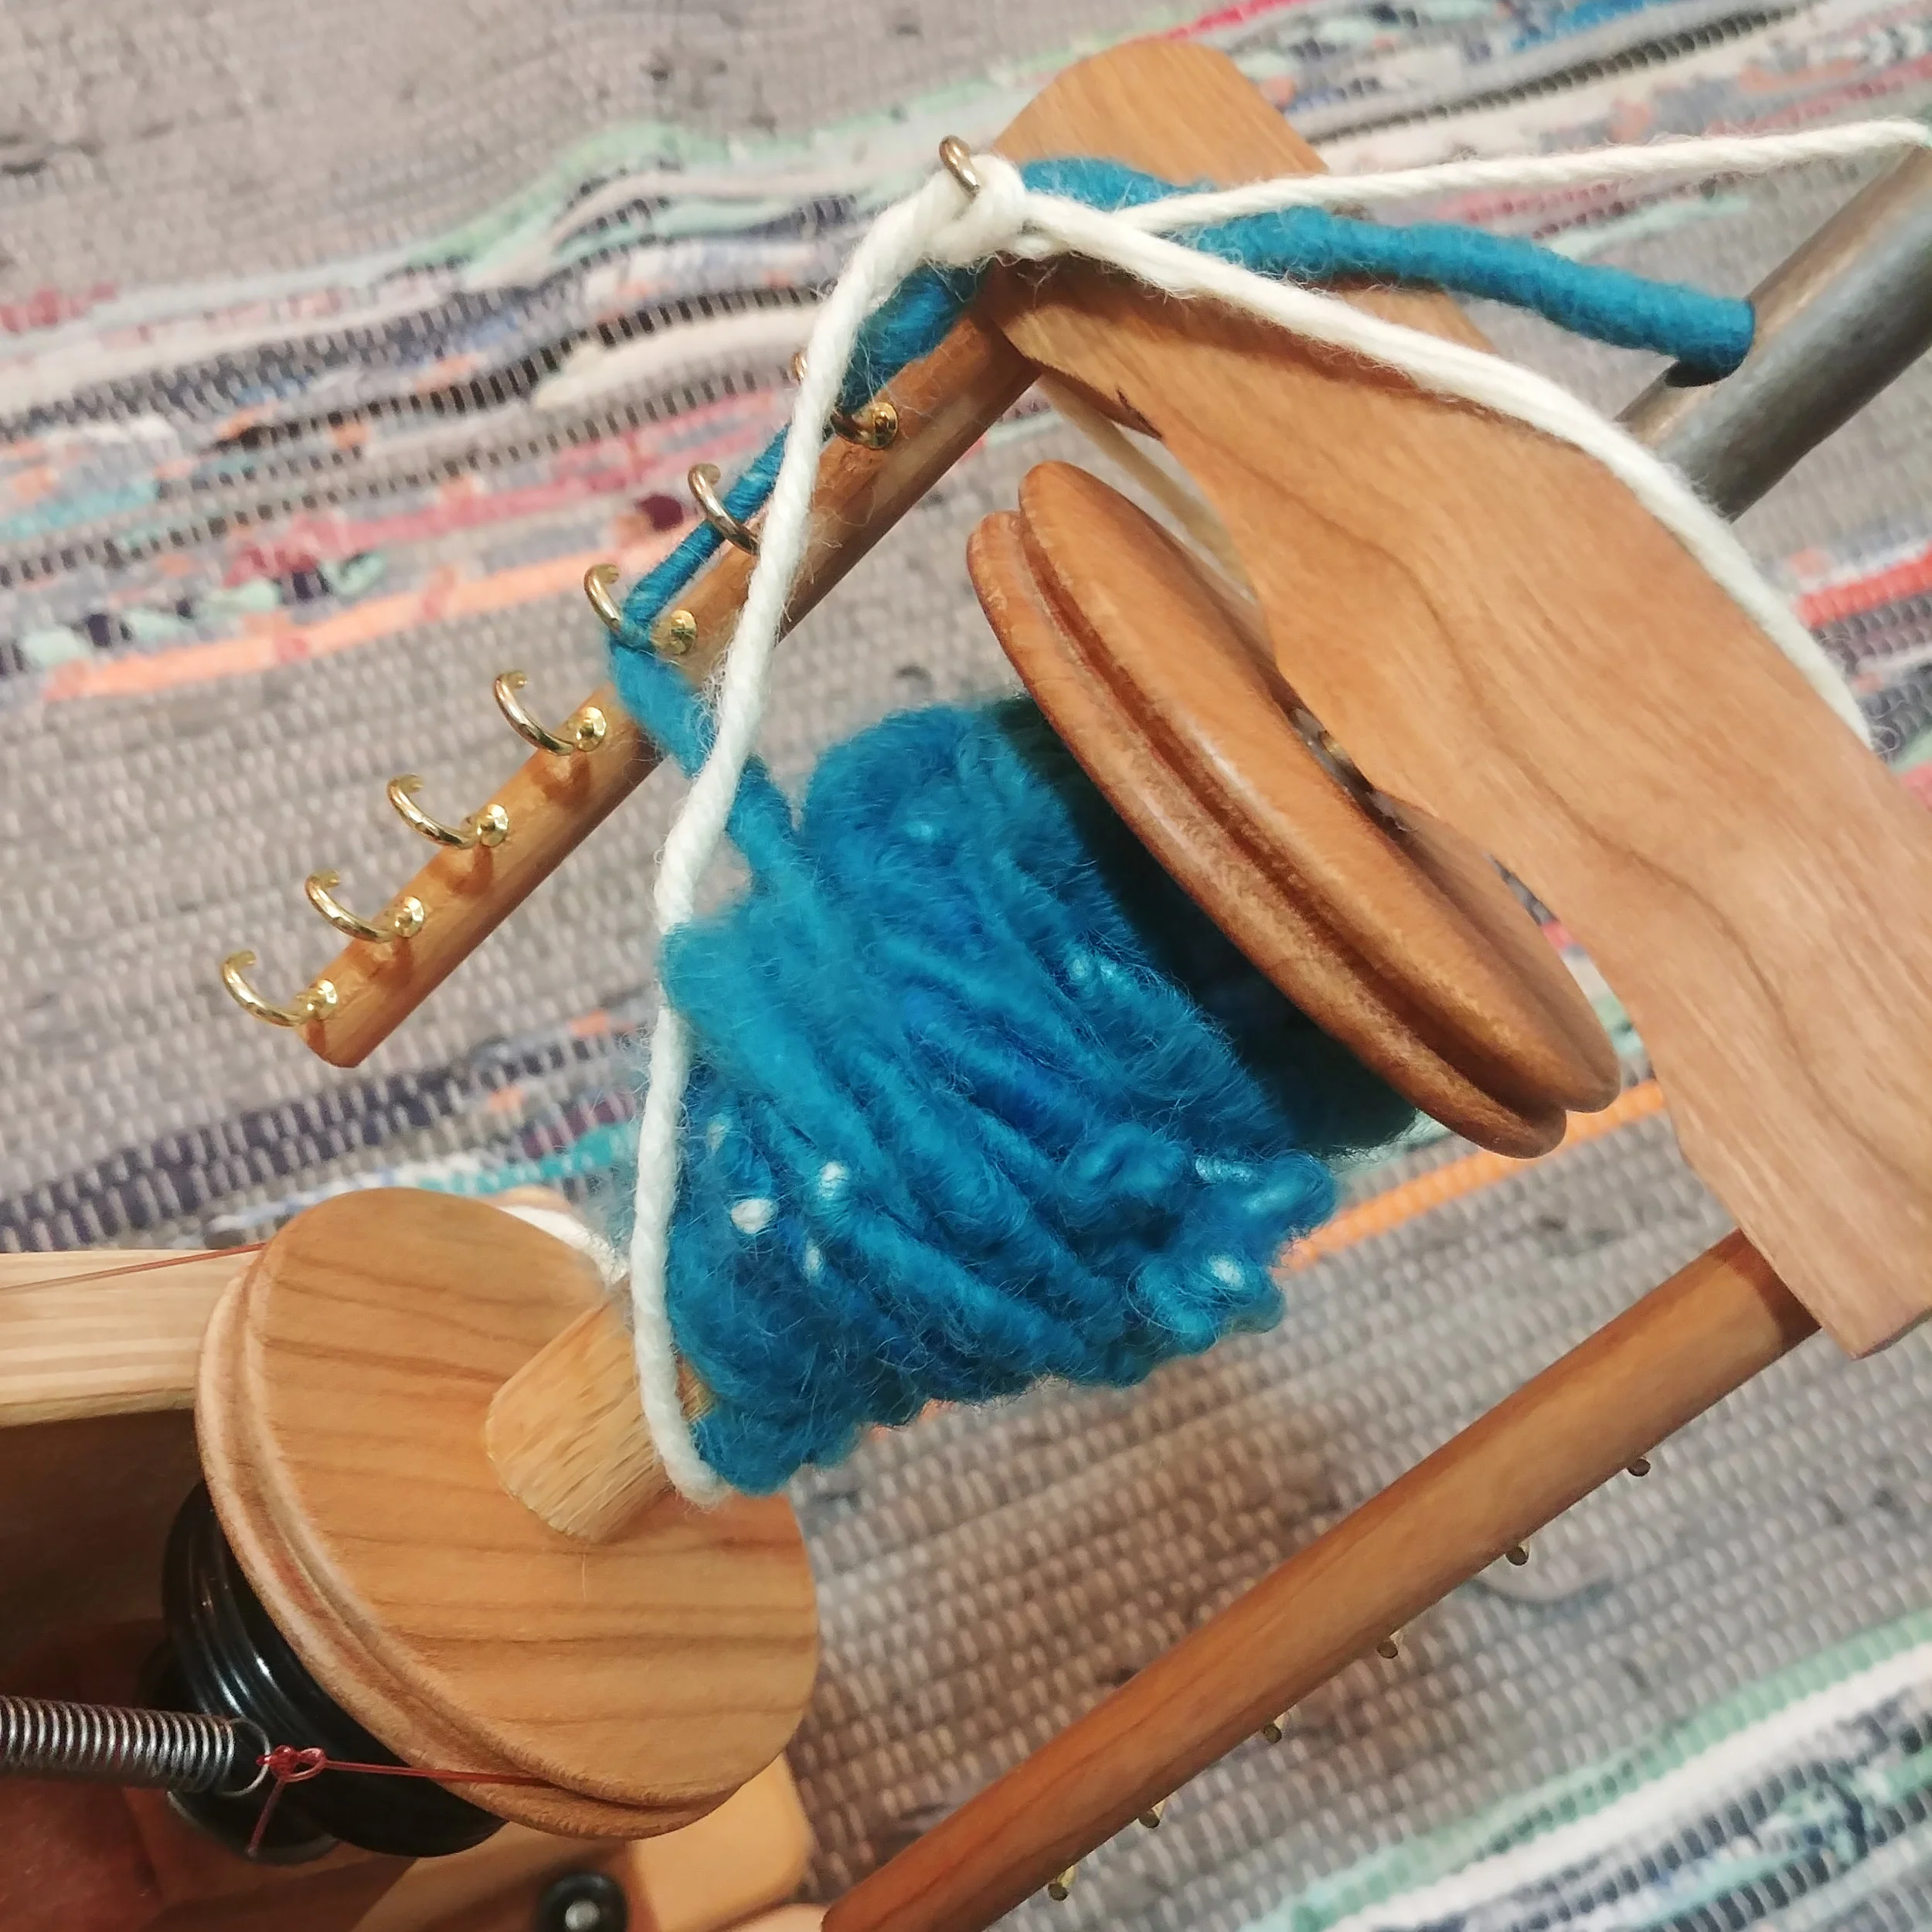
There are a few bald spots but overall it went pretty well!
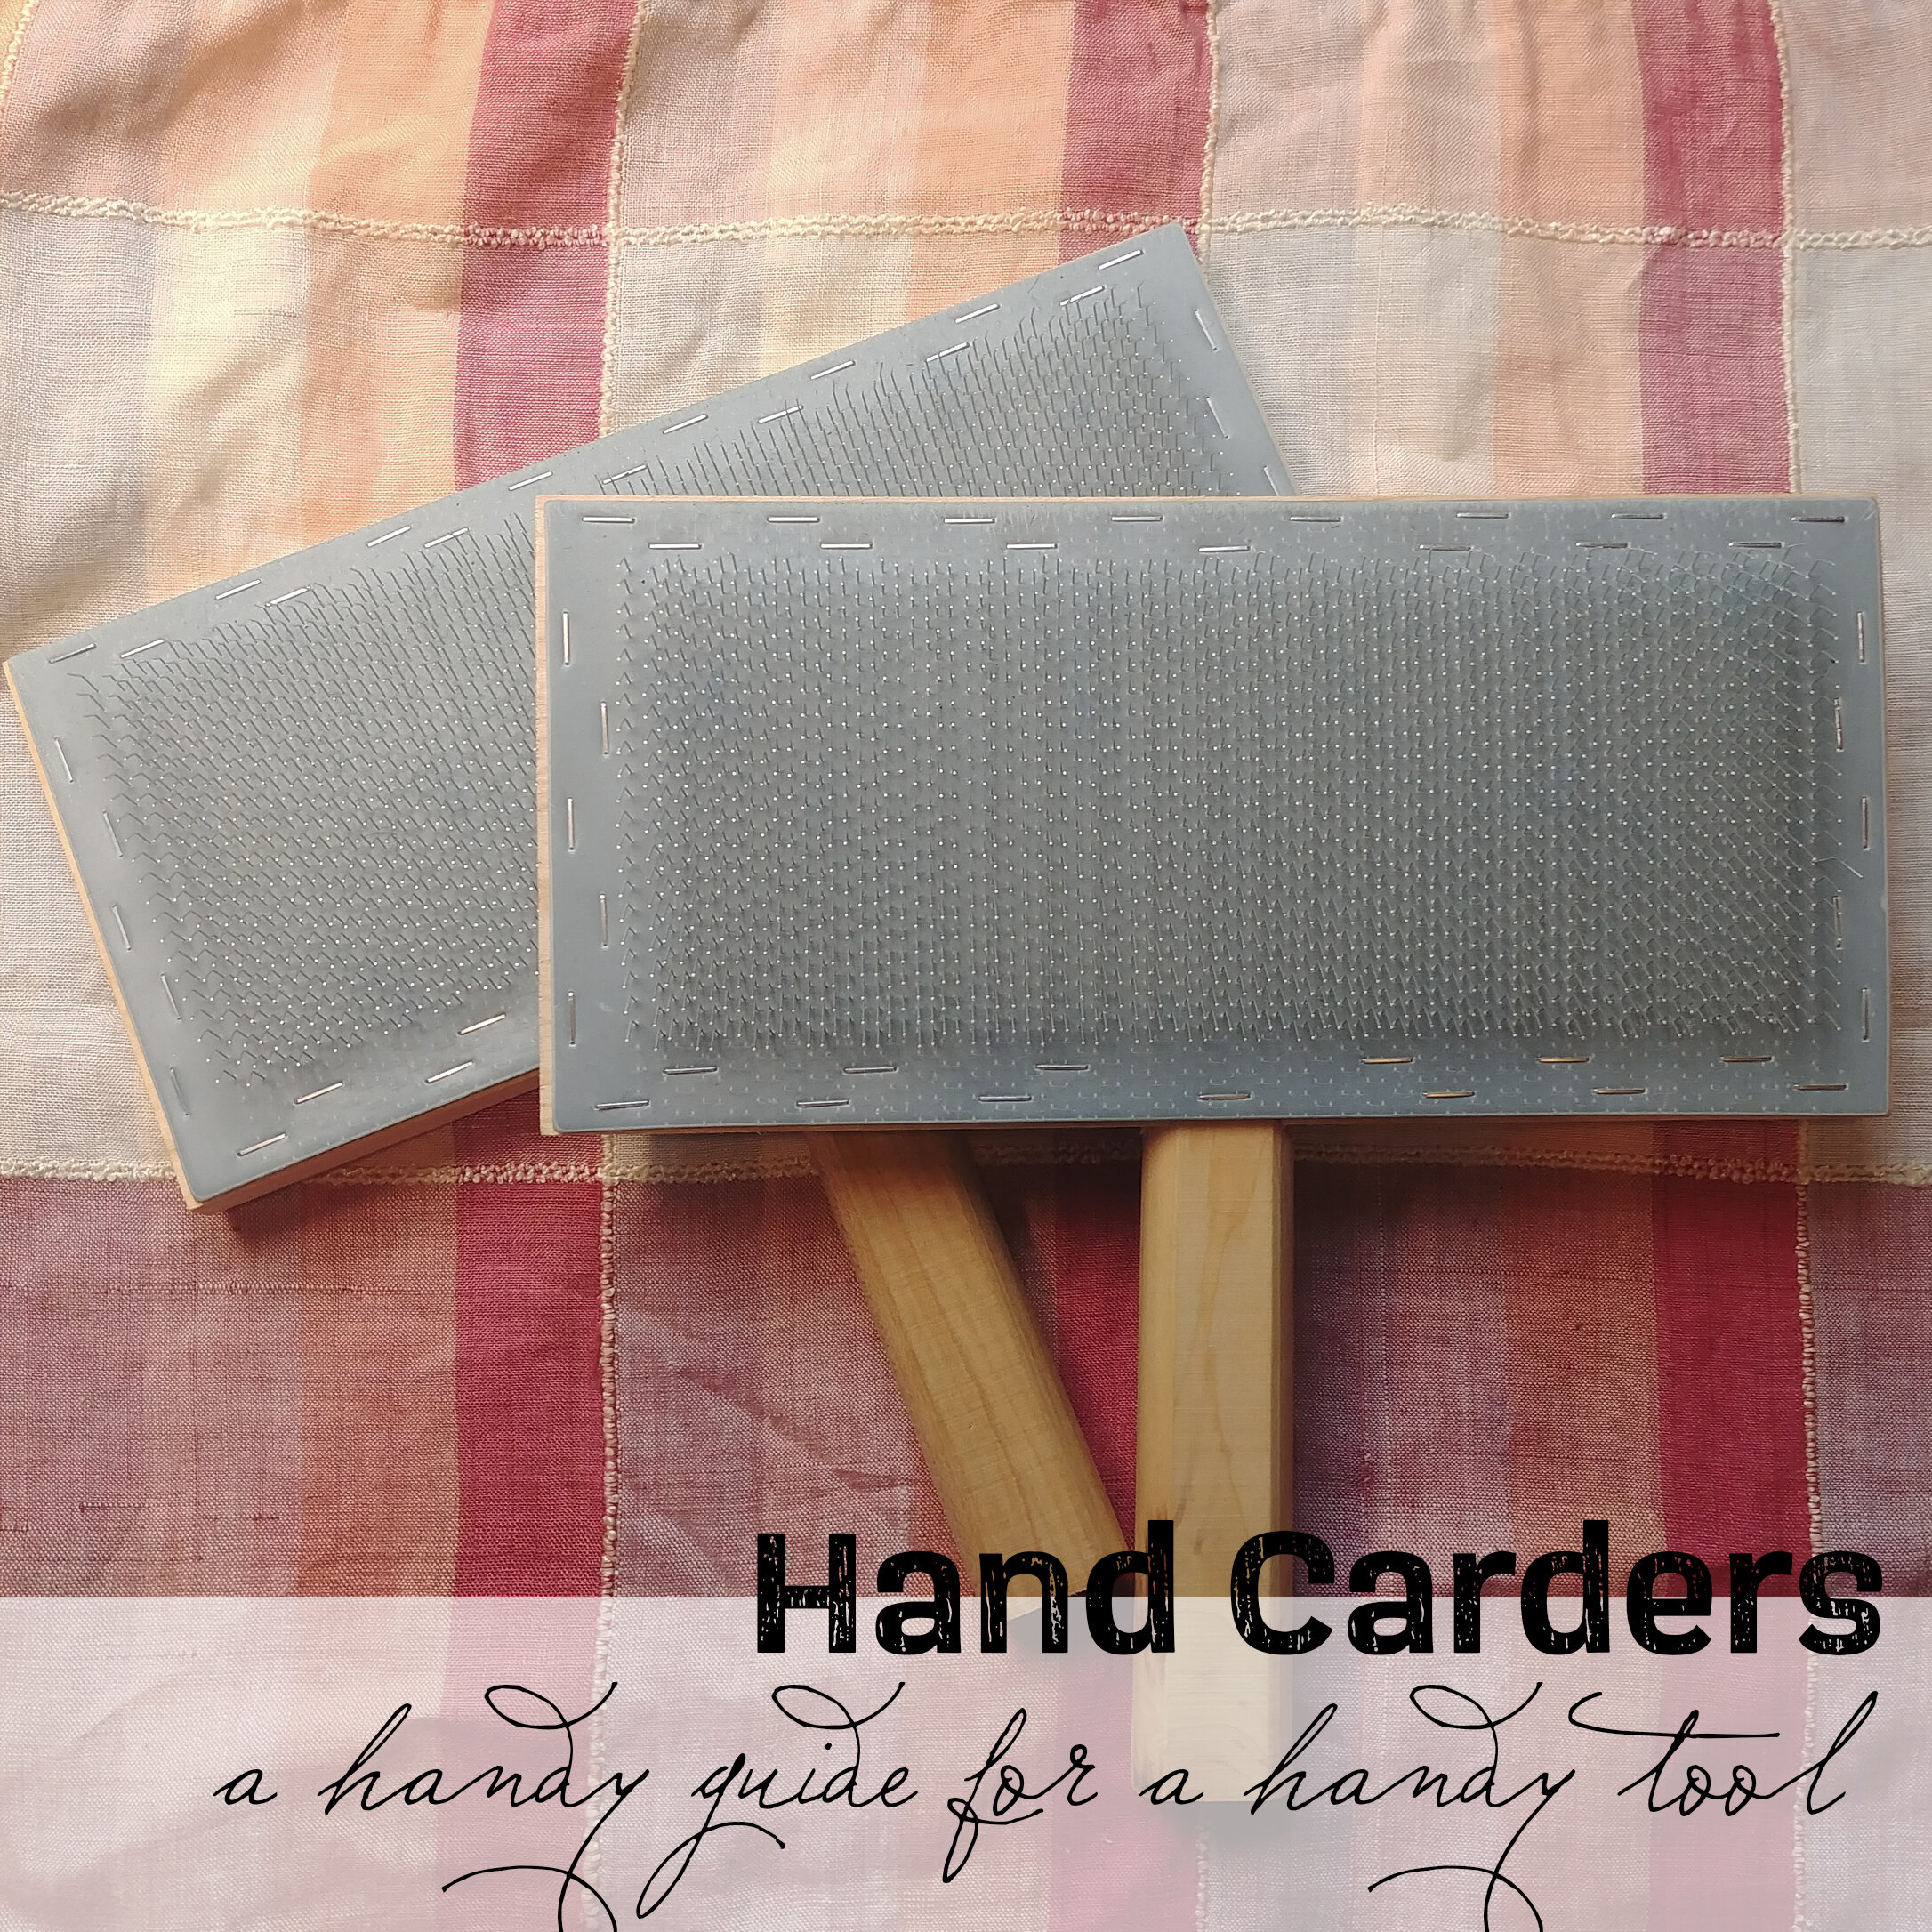
Today I decided to try core-spun yarn. I feel like spinning was a bit (just a bit) easier this time than last time. My new hand carders arrived just in time for me to try them out and card up some rolags from some alpaca I had dyed a few months ago. I have to say, since I first had to “unspin” the yarn I was going to use as my core (in the opposite direction of the way I was planning on spinning the frosting), I wish I’d thought to do that sooner. I think that practicing “spinning” existing yarn is an excellent way to get the hang of the motion of spinning without worrying about drafting. As you can see, I ended up with a few bald spots, but that’s okay! I’ll set that twist and on the loom it goes on Wednesday. Also, there’s still plenty of “spun” yarn left on the bobbin to continue practicing more core-spinning later! Oh, and in case you’re curious, the spinning wheel I have is the Merlin Roadbug, which is considered a travel wheel and therefore nice and compact and doesn’t take up a ton of space.
So there’s my first week! What did you work on this week? Are you starting any fun projects in 2019? Or are you working on finishing up some unfinished projects from last year (or even several years before)? No judgments here, I have one project that’s likely going to take me decades to complete. Some things are really more about the journey than the end product.