

Needle Felting With Silk
FTC Disclosure: Please note that some of the links in this post are affiliate or referral links (full disclosure here), and if you make a purchase or sign up for a service within a certain timeframe after clicking on one of those links, I may earn a small commission paid by the retailer at no extra cost to you. I wouldn't recommend anything that I don’t or wouldn't use myself. Thank you for your support!
This post was last edited/updated in March 2021.
For probably close to a year at this point, I've been wanting to combine my art loves (art journaling, fiber art, quilting, embroidery, free motion quilting, and of course felting) into one thing. I was just trying to figure out how. There are art journals. There are quilt journals. There are even fiber art journals which are a bit more mixed media, essentially replicating what people are already doing with art journaling. I wanted something more. Different. And truth be told, I'm not sure if it exists or not, but I have yet to come across felt journaling. So, that's what I've started doing. While I'll still be putting in crafty tutorials, guides and book reviews here and there on my Felting Friday posts, I do want to encourage you all to explore fiber felt journaling with me.
There are many purposes to art journals. They can be for therapeutic purposes, connecting with our inner child, working out our inner demons, much like you would with a diary. Except unlike a diary, it's totally okay to use a word or no words at all and just allow the page speak for itself. The only person who has to know the meaning behind it is you and whomever you choose to share it with. The other purpose, the one I'm mostly going to be exploring (though may use more personal subject matter at times) is for experimenting and practicing technique. The wonderful part about this is you don't feel limited with a journal. You can't go wrong. It's not part of a project that you might "ruin" because something didn't work out the way you wanted it to. Mistakes are okay, even encouraged, because that's how we inspire new ideas on how to play with a material. What's more, once you see the effect you get with a certain material, it may inspire a new, larger scale project or be the answer to the problem you've been trying to sort out.
For now, I'm just working on individual pages. Once I have a few done, I'll get a post with options on how to put it into a book form.
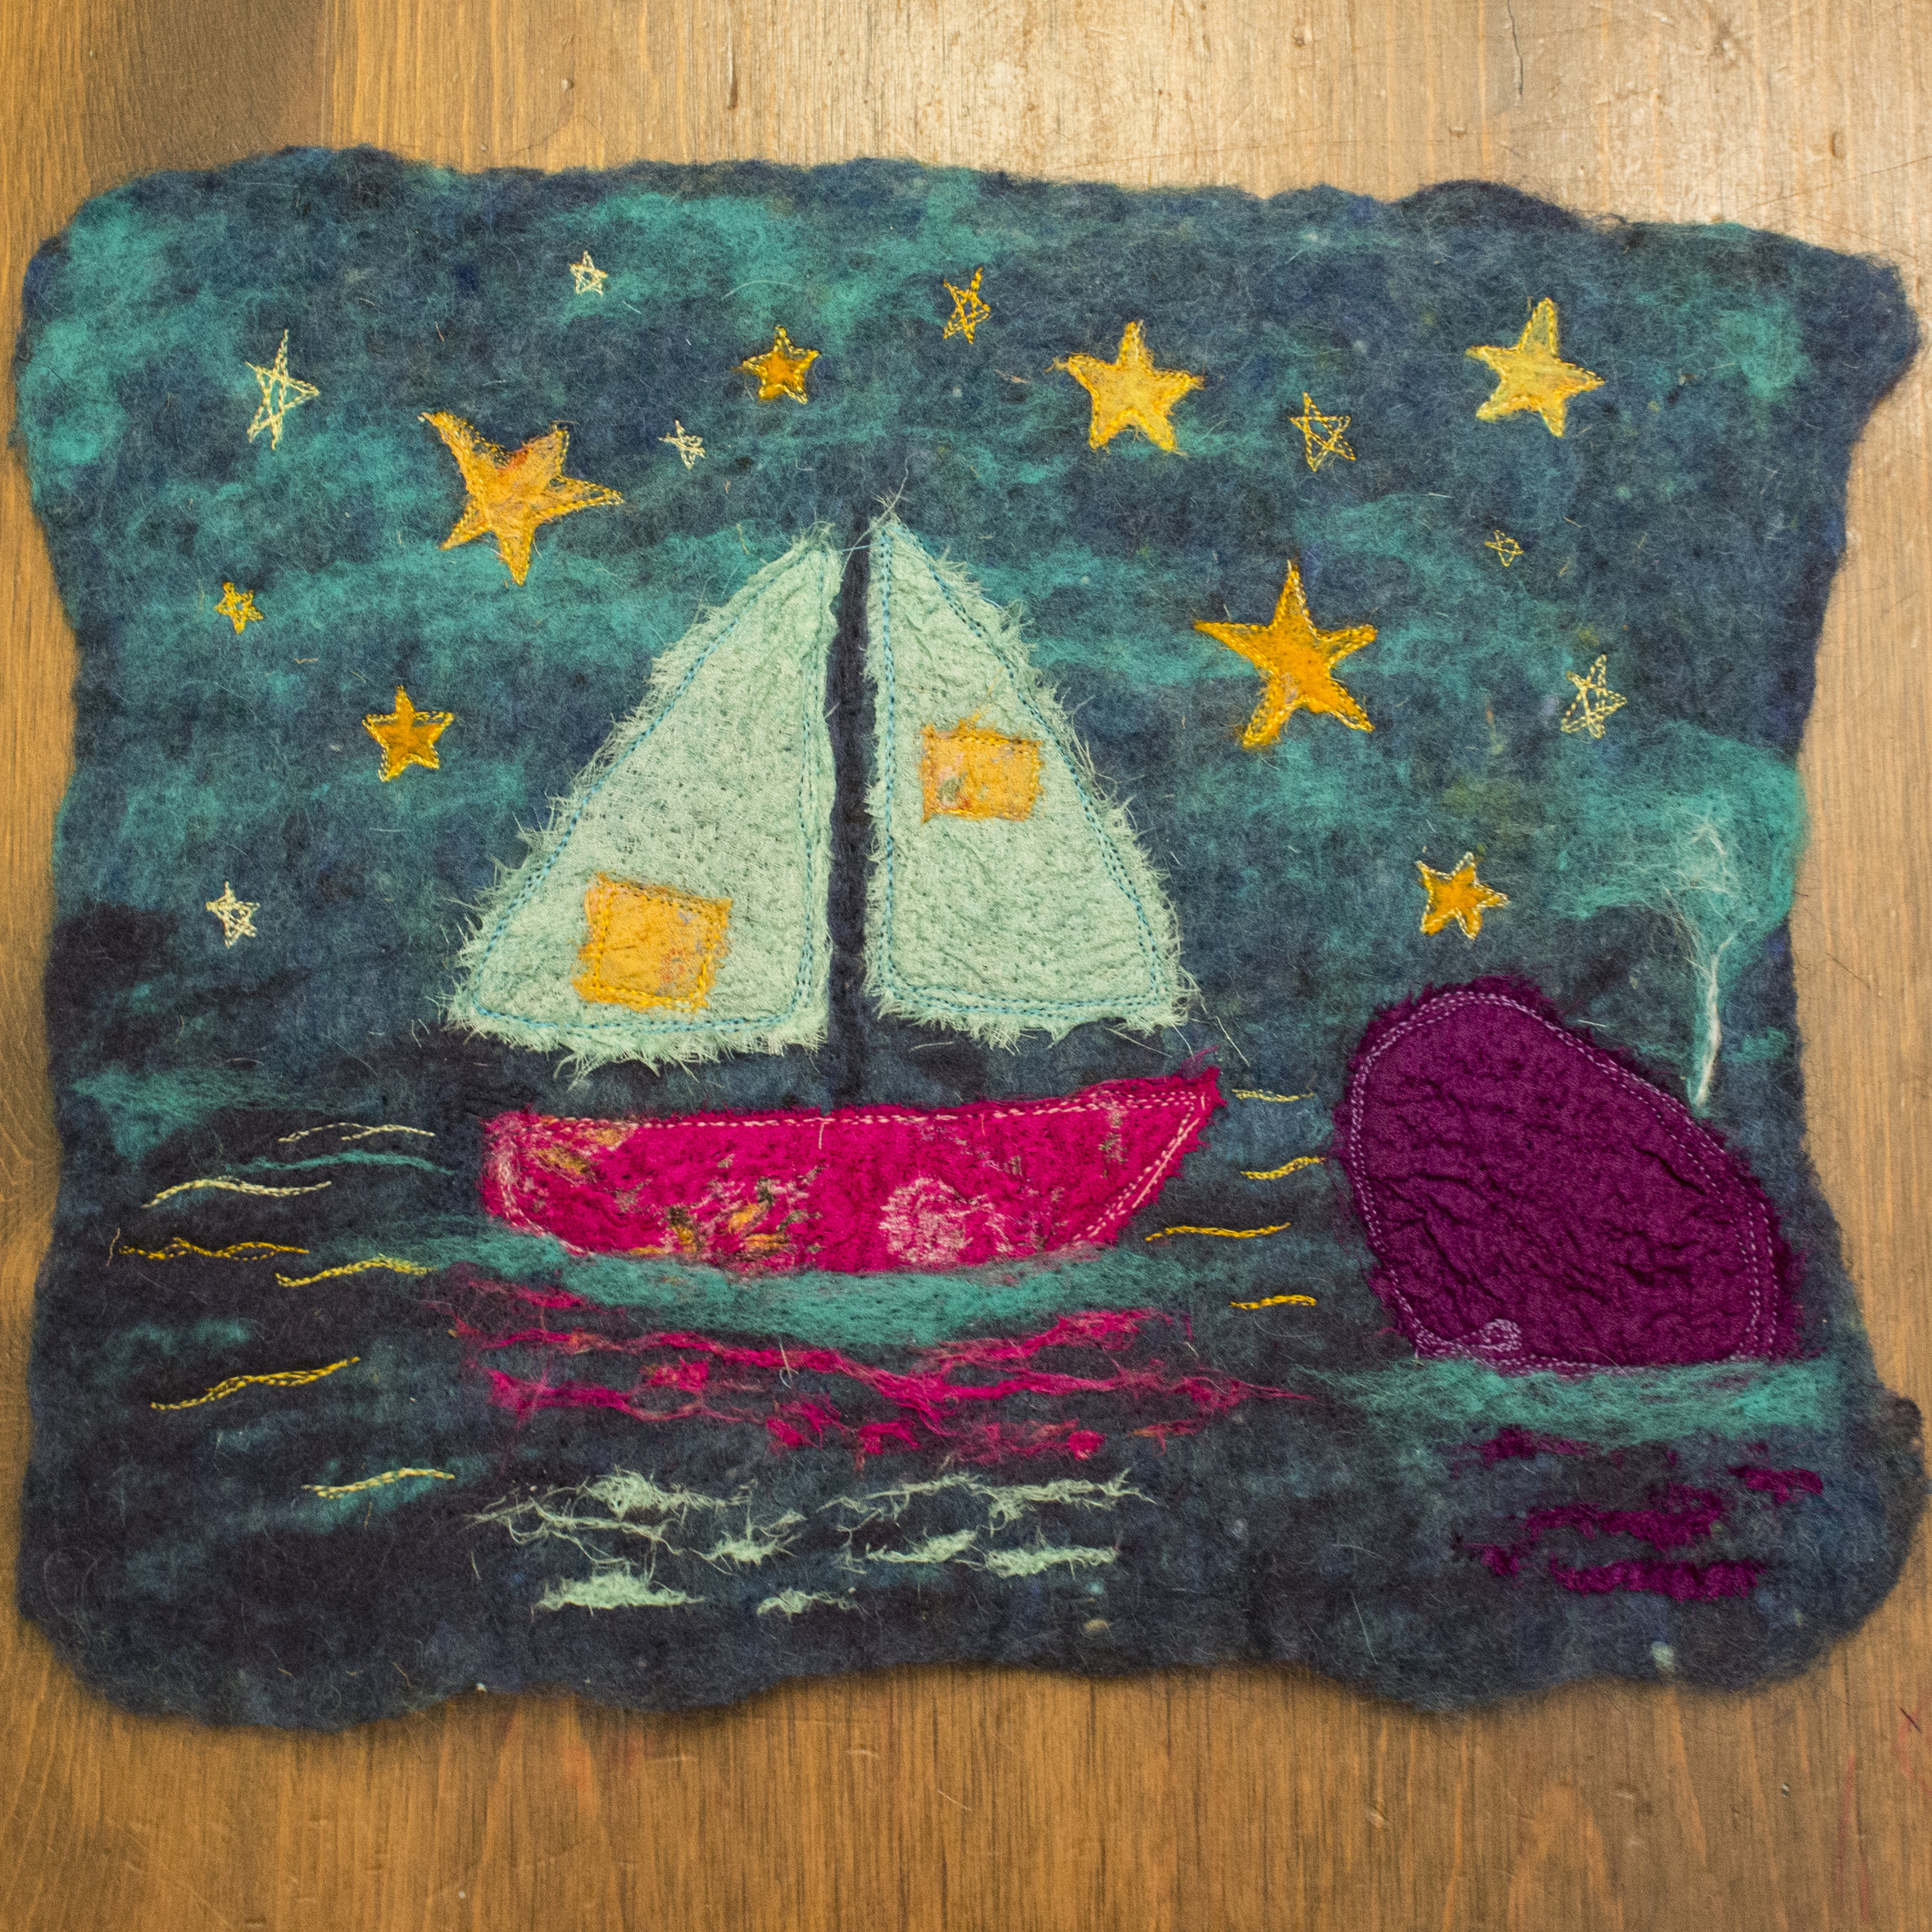
This page was inspired by a video a friend shared with me by the artist Vikki Pignatelli. Vikki creates these wonderful textural and truly inspirational quilts, and the video shows her using her embellisher to laminate fabrics. I shared a link to the video in my post about the Janome FM725. I thought it was going to be just another quilting video, which I've seen a few and do enjoy watching, but what really caught my eye was when she pulled out her embellisher and joined several sheer materials, mostly silk, some cotton, to create the texture and color that she would use for a piece. Quilting and needle felting?! I've seriously been thinking about that, and this artist has not only made it work, she's made it awesome! Note that in this sense, by felting I mean needle felting materials together, not just wool.
A year ago, I purchased a huge box of recycled saree silks from India. There's no end to them. I have used them for multiple projects already, including lounge pants, play silks, jewelry, nuno felting, and now my felt journal page. I wanted to see what would happen if I needle felted a silk sari onto some felt.
And what happened is this amazing puckered texture. You don’t need to own an embellisher - I did these by hand. When I used a single needle, I found that I got more control and a nicer pucker (as on the purple whale) than I did with a double (the boat). Instead of guessing the shrinkage, I used a larger piece and then trimmed it away once it was where I wanted it. The only place that didn't happen was with the stars, which instead of cutting out a star shape, I cut out several long triangle pieces in order to create the stars. I decided to shred some by hand and needle felted the tiny frayed pieces to make the reflection in the water. I actually managed to pull some nice silk strands from one piece which I saved for later, either to use as embroidery or, if I get enough such pieces, I can include them in one of my art batts.
Because the stars were made of many tiny pieces, I needle felted over them a bit with tiny wisps of wool to make sure they stayed in place.
I then pulled out my sewing machine with the free motion quilting foot attached and went to work, outlining the stars, adding a few stars that are not filled in, going around the edges of the silks a few times (much like an applique) and added some sparkle to the waves. At the end, I used a bit of my own dyed teal wool (some of the same color was in the background prefelt) and needle felted over the bottom of the whale and the boat, and added a waterspout to the whale.
Thoughts: using the silk in a felt painting (along with free motion stitching) gives this wonderful contrast between the softness of the wool, the crispness of the stitches and the shadows from the texture of the silk. I will likely continue to play with this material and see what effect I can get when I continue to layer silk and wool on top of each other. Why not try it for yourself?

